Have you ever stood at the altar of someone’s wedding, eyes drifting to that gorgeous floral arch behind the couple, and quietly thought I could never pull that off? I used to think the same thing — until I realized that most of those stunning ceremony backdrops are made by real people, working with real budgets, in their driveways the night before the big day.
Whether you’re planning your own wedding, helping a friend, or just love a beautiful creative challenge, building a DIY wedding arch is far more achievable than it looks. Together, we’re going to walk through five completely different arch styles — from dreamy florals to boho driftwood — with materials lists, honest cost estimates, and tips that work even if you’ve never held a power drill in your life.
Key Takeaways
- Five distinct DIY wedding arch styles covered — from PVC pipe florals to boho driftwood — with something for every aesthetic and skill level.
- Most builds can be completed for $40–$200 in materials, making them a fraction of the cost of renting or buying a pre-made arch.
- No carpentry experience is needed for any of these projects — just patience, a few tools, and a good playlist.
- Assembly tips and common mistakes are included for each style so your build goes smoothly on the first try.
- Florals and greenery can be fresh, dried, or faux — all three approaches are addressed with honest trade-offs.
- Each arch can be repurposed after the wedding as a garden feature, photo backdrop, or home décor statement piece.
Why a DIY Wedding Arch Is Worth Every Minute
Before we dive into the builds themselves, let’s talk about why so many couples and planners are going the DIY route for their wedding ceremony backdrop. The short answer: it saves money, adds meaning, and gives you complete creative control over one of the most photographed moments of the day.
The Real Cost of a Wedding Arch
Renting a basic floral arch from a wedding vendor can run anywhere from $300 to over $1,500 depending on your market and the florals included. Buying a pre-made metal or bamboo arch typically costs $150–$400 — and that’s before you’ve added a single flower or ribbon.
The five DIY wedding arch builds in this post range from approximately $40 to $200 total, including florals. That’s a significant saving that you can redirect toward your catering, photography, or honeymoon fund.
The Sentimental Edge
There’s something genuinely special about building the backdrop to your own vows. I’ve worked with couples who involved their whole family in the build the day before — it became its own pre-wedding tradition, a craft night full of laughter and a little hot glue. That kind of memory doesn’t come with a rental.
And after the day? Each of these arches can live on as a garden feature, a photo backdrop for future shoots, or even a decorative piece in your home. If you love the idea of purposeful, lasting design — the same philosophy I bring to inexpensive family room updates that actually transform a space — then building your arch yourself is absolutely the move.
Build 1: PVC Pipe Floral Wedding Arch
The PVC pipe wedding arch is the most popular starter build for a reason. PVC is lightweight, affordable, widely available, and requires zero tools to assemble beyond a mallet or your hands. The result is a clean, rounded arch that’s practically made for lush floral arrangements.
Materials List and Approximate Cost
- 2x 10-foot sections of ¾-inch PVC pipe — $10
- 2x 5-foot sections of ¾-inch PVC pipe (uprights) — $5
- 1x curved PVC conduit or flexible PVC for the arch top — $8
- 4x PVC elbows and connectors — $6
- 2x PVC flanges (base plates) for freestanding stability — $12
- Floral supplies (silk or fresh): garlands, stems, floral wire, zip ties — $30–$60
- Total estimated cost: $70–$100
Assembly Tips for First-Timers
Start by dry-fitting all your pieces before committing to any glue — trust me, this saves headaches. Push each pipe section firmly into its connector; PVC holds surprisingly well with pressure alone for a one-day event, so you may not even need PVC cement.
For the floral arch itself, build your arrangements on the ground in sections using floral wire wrapped around the pipe, then attach them working upward from the base. Zip ties are your best friend here — hidden under leaves, they’re invisible in photos. Layer greenery first, then add larger blooms, then fill with smaller accent flowers for a natural, layered look.
Weight the flanges with sandbags or heavy rocks hidden behind fabric for outdoor stability. If wind is a concern, stake the flanges lightly into soft ground with tent pegs.
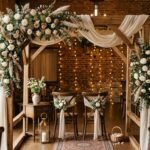
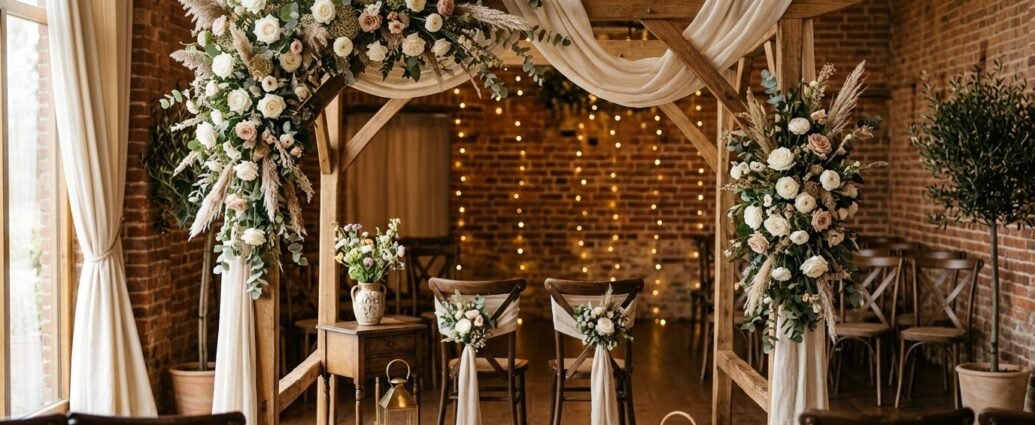
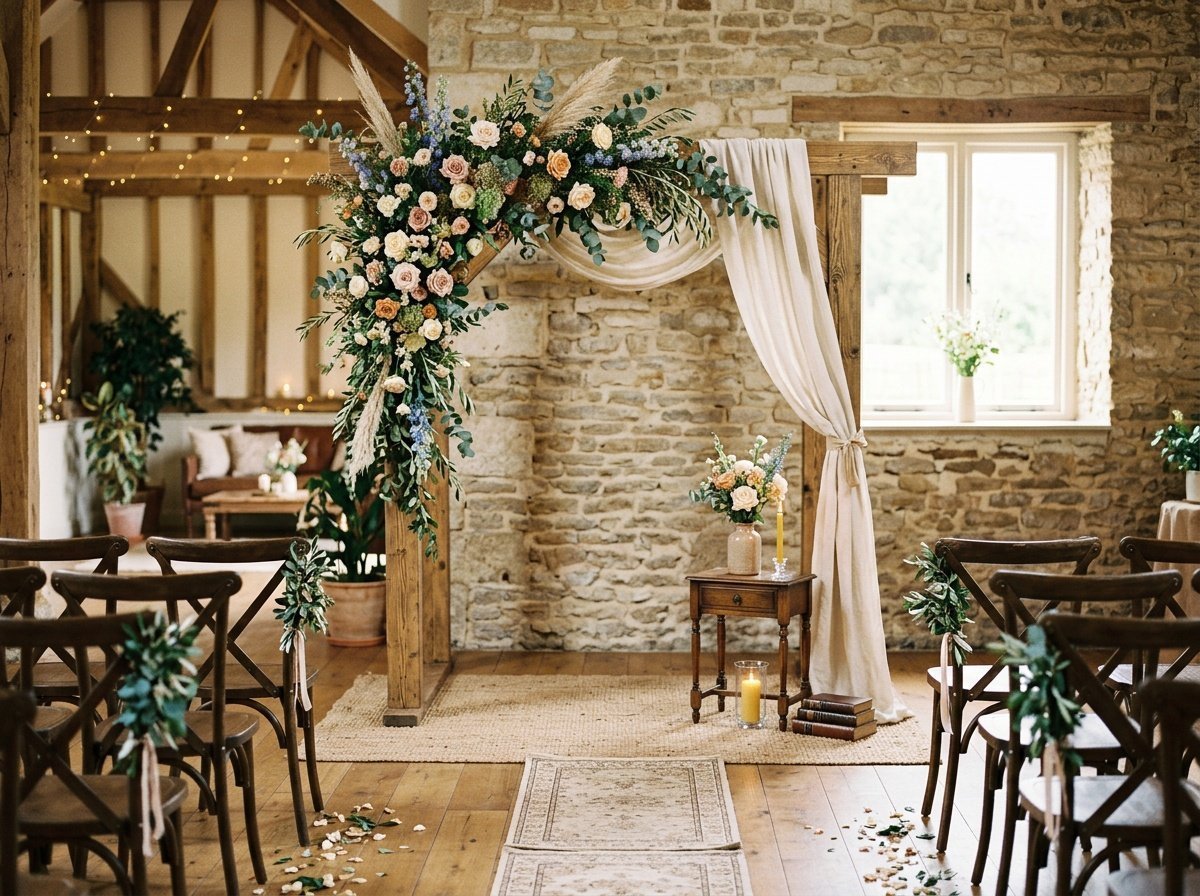
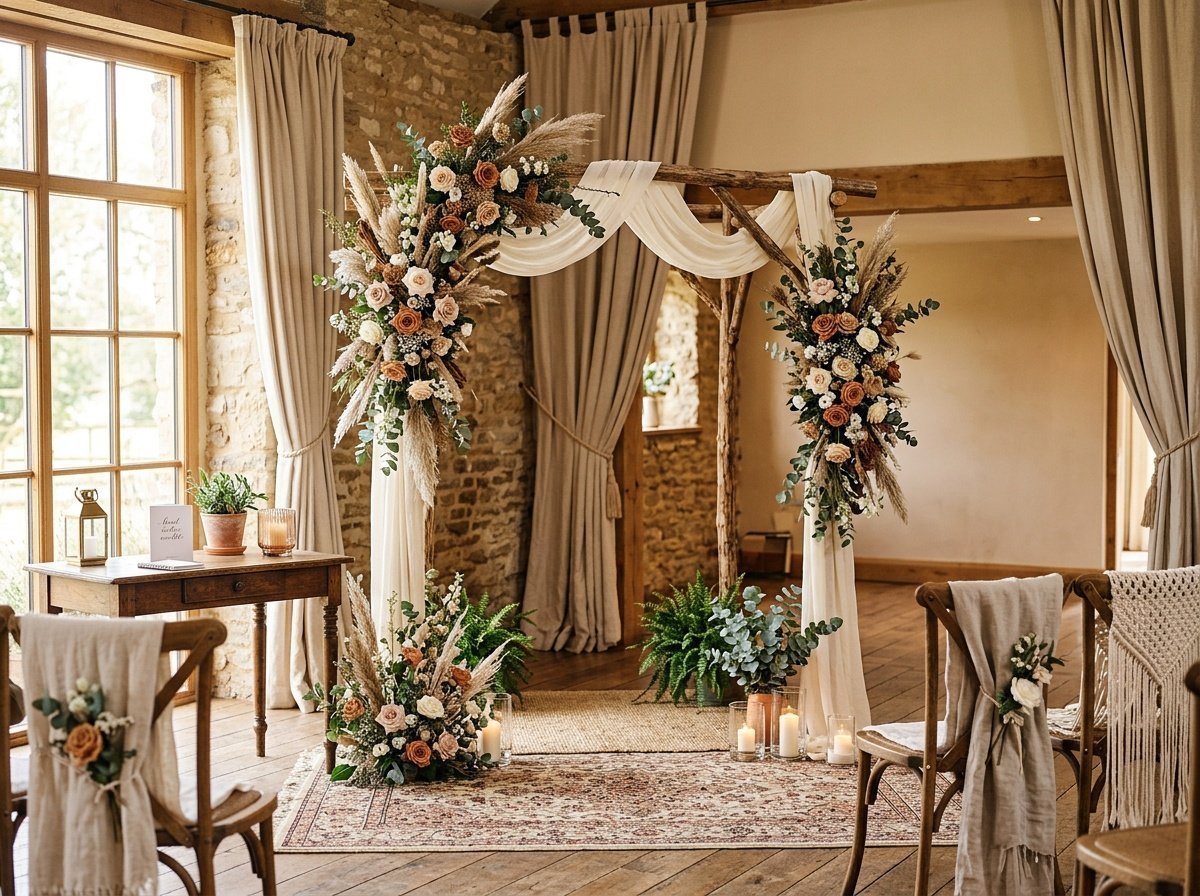
Build 2: Wooden A-Frame with Greenery
The wooden A-frame arch is the one that reads as most “designer” in photos — clean geometry, warm timber tones, and a structure that holds heavy greenery effortlessly. Don’t let the woodworking element intimidate you; this build uses simple lumber and basic connectors anyone can manage.
Materials List and Approximate Cost
- 4x 8-foot 2×4 pine boards — $20
- 2x 6-foot 1×4 crossbeams — $8
- Wood screws (2-inch and 3-inch) — $6
- Corner brackets (optional but recommended) — $10
- Sandpaper and wood stain or white paint — $15
- Greenery: eucalyptus garlands, fern bundles, or ivy — $20–$50
- Twine, floral wire, and ribbon — $8
- Total estimated cost: $87–$117
Building Without Carpentry Experience
The key to this arch is in the angle. You’ll lean two pairs of boards together to form the A shape, connected at the top with a crossbeam. Pre-drill your screw holes to prevent splitting the wood — a basic hand drill from a hardware store costs under $20 and is worth every penny.
Sand all edges smooth before assembling, especially if the arch will be near a flowing dress. A light coat of white paint or warm walnut stain takes about an hour to dry and makes the whole structure look intentional and finished. Drape greenery garlands over the crossbeam and tie them loosely with twine — imperfect loops actually photograph more beautifully than overly neat arrangements.
Styling the Greenery
Eucalyptus is the undisputed queen of wedding greenery. It’s fragrant, long-lasting out of water, and drapes naturally. Layer seeded eucalyptus with silver dollar eucalyptus and a few sprigs of olive branch for a Mediterranean garden feel. Add white ranunculus or garden roses tucked into the foliage for a finishing touch that looks expensive but isn’t.
Build 3: Copper Pipe Geometric Arch
If your wedding aesthetic leans modern, minimal, or industrial-chic, the copper pipe geometric arch is going to stop people mid-scroll. It’s sleek, sculptural, and when dressed with dried pampas grass or a few strategic blooms, it looks like something from an editorial shoot.
Materials List and Approximate Cost
- 6x 10-foot sections of ½-inch copper pipe — $48
- Copper elbows, T-connectors, and end caps — $20
- Copper pipe cutter (handheld, no power needed) — $12
- Plumber’s flux and solder or strong pipe adhesive — $10
- Pampas grass, dried grasses, or silk florals — $20–$40
- Total estimated cost: $110–$130
Cutting and Connecting Without a Plumber
A handheld pipe cutter costs about $12 and works like a simple clamp — you rotate it around the pipe and it cuts cleanly in under a minute. No saw required. Measure and mark your pieces first, then cut all sections before assembly to avoid recalculating on the fly.
For a one-day event, strong pipe adhesive works perfectly and skips the soldering entirely. Press each joint firmly and allow the cure time specified on the label — usually 30 minutes to an hour — before moving the structure. Build flat on the ground, then raise it into position when fully set.
The Geometric Design Options
The simplest version is a rectangle or square frame: four uprights, four crossbars, done. For something more architectural, add a triangular peak at the top using angled cuts and T-connectors. An asymmetric arch — one tall side, one shorter — is also trending beautifully and is actually easier to build than a perfectly symmetrical version.
| Arch Style | Approx. Cost | Skill Level | Best Aesthetic |
|---|---|---|---|
| PVC Pipe Floral | $70–$100 | Beginner | Romantic, Garden, Classic |
| Wooden A-Frame | $87–$117 | Beginner–Intermediate | Rustic, Boho, Farmhouse |
| Copper Geometric | $110–$130 | Intermediate | Modern, Minimal, Industrial |
| Bamboo Tropical | $40–$70 | Beginner | Tropical, Tiki, Beach |
| Driftwood Boho | $50–$80 | Beginner | Boho, Coastal, Earthy |
Build 4: Bamboo Tropical Arch
The bamboo tropical arch is the easiest and most affordable build on this list — and it’s also the most naturally beautiful in an outdoor setting. Bamboo poles are incredibly strong, lightweight, and require no cutting or power tools whatsoever if you source them in the right lengths.
Materials List and Approximate Cost
- 4x 8-foot bamboo poles (1.5–2 inches diameter) — $16
- Natural jute twine — $5
- Tropical foliage: palm fronds, monstera leaves, bird of paradise stems — $15–$35
- Orchids or hibiscus blooms (fresh or faux) — $8–$12
- Floral wire and ribbon — $5
- Total estimated cost: $49–$73
Assembly Tips
Cross two pairs of bamboo poles at roughly 7 feet high, lashing them together at the crossing point with jute twine using a square lashing knot. YouTube has excellent 2-minute tutorials on this knot — it’s genuinely simple and holds like a dream. Lay the two A-frame crosses on the ground, then connect them at the top with a horizontal pole, again secured with twine.
Push the base ends firmly into soft ground for an outdoor ceremony — bamboo stakes naturally anchor well in soil. For indoor ceremonies or hard surfaces, fill four large terracotta pots with sand or gravel and nestle a pole into each one. These pots can then be dressed with tropical foliage to become part of the overall display.
Styling the Tropical Look
The palette here is all about contrast: deep green monstera leaves, golden palm fronds, and a few vivid floral pops in coral, fuchsia, or white. Attach large leaves to the poles with soft floral wire — wrap loosely so you don’t bruise the stems. Think lush and layered rather than structured and formal. The more organic and wild it looks, the more intentional it reads in photos.
“The most beautiful wedding arches don’t look built — they look found. Like nature arranged itself just for the moment.”
Build 5: Driftwood Boho Arch
The driftwood boho arch is for the couple who wants their ceremony backdrop to feel like it washed up on a windswept beach and simply belonged there. It’s earthy, organic, deeply romantic — and almost entirely forageable if you live near the coast or a wooded area.
Materials List and Approximate Cost
- 2x large driftwood branches or reclaimed wooden posts (6–8 feet tall) — free to $30
- 1–2x horizontal driftwood pieces for the crossbar — free to $15
- Heavy-gauge wire or jute twine for lashing — $5
- Weighted base buckets (galvanized metal filled with sand) — $20
- Dried pampas grass, macramé hangings, dried flowers — $20–$40
- Ribbon or linen fabric for draping — $8
- Total estimated cost: $53–$118 (lower if you forage)
Finding Your Driftwood
Coastal beaches, riverbanks, and even antique shops often yield beautiful driftwood pieces at little to no cost. You’re looking for pieces that are structurally sound — give them a firm bend test before committing. Avoid anything that crumbles easily or has active insect damage. A light brush-clean and a few hours in the sun is all the prep most driftwood needs.
If foraging isn’t an option, Etsy sellers specializing in driftwood ship nationwide, and many landscape supply yards carry reclaimed branches. Alternatively, plain wooden garden stakes from a hardware store, lightly sanded and whitewashed, give you the same visual effect without the treasure hunt.
Assembly and Styling the Boho Look
Nestle each upright piece securely into your weighted buckets — pack sand tightly around the base and test stability before decorating. Lash your horizontal crossbar using heavy-gauge wire twisted tight, reinforced with jute twine for aesthetics. The connection doesn’t need to be perfect; slight irregularity is part of the charm.
Hang macramé pieces, dried pampas plumes, and cascading dried florals from the crossbar using slip knots. Mix textures freely: linen ribbon, cotton macramé, dried lunaria pods, bleached shells. The earthy color story here — cream, warm sand, dusty rose, sage — pairs beautifully with the kind of intentional, nature-forward palette I love to explore across both interiors and styled spaces, not unlike the earthy, calming color trends making such an impact in design right now.
Fresh, Dried, or Faux Florals: Which Should You Choose?
One of the most common questions I get about the floral wedding arch isn’t about construction — it’s about flowers. Which type of florals will actually look good and hold up through the ceremony? The honest answer depends on your timeline, budget, and climate.
Fresh Florals
Fresh flowers are undeniably the most beautiful choice, but they come with a narrow window. Most fresh arrangements need to be assembled no more than 12–18 hours before the ceremony, kept cool, and misted regularly. In heat above 80°F, delicate blooms like peonies and ranunculus will wilt within hours. Sturdier options like roses, orchids, and greenery hold up significantly better outdoors.
Dried Florals
Dried florals — pampas grass, dried lavender, lunaria, wheat, cotton stems — are having a genuine moment in wedding design, and for good reason. They can be prepared weeks in advance, travel beautifully, and require zero water or refrigeration. They also photograph with a soft, dreamy texture that fresh flowers sometimes don’t achieve. The trade-off is that colors are more muted, so if you want vivid saturation, dried florals may not be your choice.
Faux Florals
High-quality silk and faux flowers have come an incredibly long way. Many budget-conscious couples are building their entire arch with premium faux arrangements, then keeping them as home décor long after the wedding. The investment is similar to buying fresh for a large arch, but the flowers never wilt, never need water, and can be shipped weeks in advance without any stress.
Tips for Transporting and Setting Up Your Arch on the Day
Building your arch at home is one thing. Getting it to the venue in one piece — and setting it up quickly while wearing your wedding outfit — is another challenge entirely. A little planning here saves enormous stress on the actual day.
Build in Sections
Every arch on this list can and should be built in modular sections that assemble at the venue. Don’t transport a fully assembled 8-foot arch unless you have a truck and a lot of patience. Label each piece with masking tape and a marker so setup is essentially paint-by-numbers for your helpers.
Designate a Setup Team
Assign two people specifically to arch setup — not yourself, not the maid of honor, not anyone in the wedding party. A friend, sibling, or parent who isn’t involved in getting ready is the ideal candidate. Give them a printed photo of the finished arch, the labeled pieces, and a 30-minute window before guests arrive.
Bring Extra Supplies
Pack a small emergency kit: extra floral wire, zip ties, a hot glue gun with extension cord, extra ribbon, and a small hand mister for fresh florals. Murphy’s Law loves weddings. A bit of extra greenery tucked into a water bucket in your car has saved more than one arch moment I’ve witnessed.
Frequently Asked Questions
How far in advance should I build my DIY wedding arch?
Build the structural frame at least 1–2 weeks before the wedding to work out any stability issues without pressure. If you’re using faux or dried florals, you can decorate the frame up to a week ahead. Fresh florals should be added no more than 12–18 hours before the ceremony for best results.
Can a DIY wedding arch stand outdoors without blowing over?
Yes, with the right anchoring. For soft ground, stake the base legs into the soil with tent pegs or garden stakes. For hard surfaces like concrete or wood decking, use weighted buckets filled with sand or gravel, or purpose-made base flanges. Always test your arch in conditions similar to your venue — and have a backup plan for unexpectedly windy days.
How do I make a wedding arch without power tools?
Three of the five builds in this post require zero power tools: PVC pipe, bamboo, and driftwood arches all assemble with hand pressure, a pipe cutter, or simple lashing. The wooden A-frame benefits from a basic hand drill, but a screwdriver can work for smaller screws. The copper pipe arch uses a hand-held pipe cutter — no electricity needed.
What’s the cheapest DIY wedding arch to build?
The bamboo tropical arch is the most affordable at approximately $40–$70 total, especially if you source foliage from a local florist or tropical plant supplier. The driftwood boho arch can cost even less if you’re able to forage your own wood — sometimes as little as $20–$30 for the non-wood supplies.
How do I attach flowers and greenery to my arch?
Floral wire and zip ties are the two workhorses of arch decorating. Wrap stems in floral tape first to protect them, then wire or zip-tie loosely to the frame so you can adjust positioning. A hot glue gun works well for securing smaller accent blooms, dried florals, and ribbon. Always layer: greenery first, larger blooms second, small filler flowers last.
Can I rent arch supplies instead of buying?
Some party rental companies and wedding prop businesses rent frame structures (especially metal and PVC arches) that you decorate yourself. This is a great hybrid option — you get a professional-grade frame without the storage question afterward, and you still control the florals and styling completely. Check local wedding Facebook groups and event rental companies in your area.
What can I do with my wedding arch after the ceremony?
So many things. The wooden A-frame becomes a beautiful garden trellis. The copper geometric arch works as a stylish room divider or photo backdrop for future events. The bamboo arch can frame a garden bed. The driftwood piece makes a stunning statement hanging in an entryway or bedroom. Building something that has a life beyond the wedding makes the effort even more worthwhile.
Building your own wedding arch — whatever the style — is one of those projects that rewards you twice: once in the making, and once in the moment when you stand beneath it. You don’t need experience, expensive tools, or a background in floristry. You need a vision, a materials list, and the confidence that beautiful things are absolutely within reach. Start simple, give yourself more time than you think you need, and remember — the imperfections are what make it yours. Now go build something gorgeous. 🌿