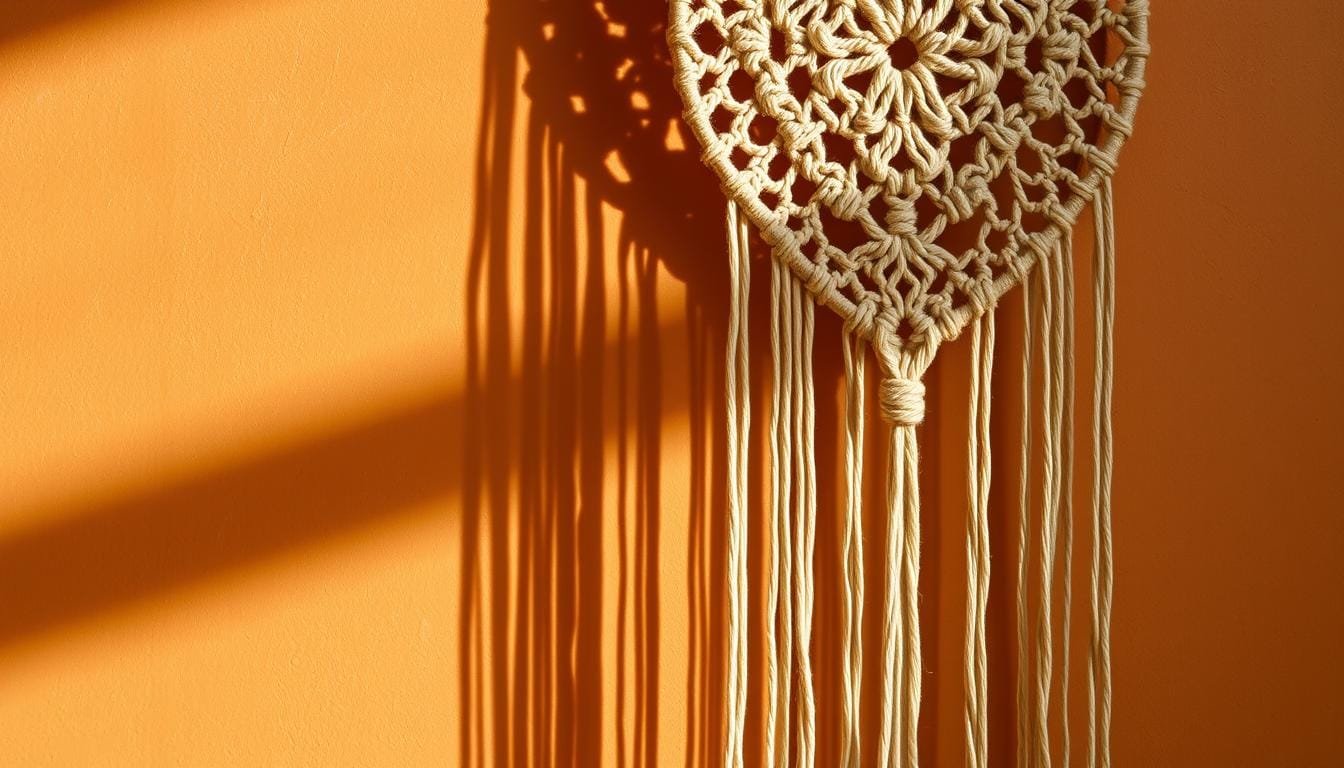
One cozy Sunday afternoon, I was scrolling through Pinterest. I found many beautiful DIY macrame wall hangings. As I enjoyed my coffee, the beauty and simplicity of macrame caught my eye. Who would have thought simple knots could make such beautiful art?
I wanted to bring a special touch to my home, just like you. That’s when I found a great guide for beginners. Have you ever looked at a macrame wall hanging and wished you could make it? If so, you’re in the perfect spot. 😊
In this guide, we will show you how to make a beautiful wall hanging. It will be about 22″ W x 48″ L. You’ll use a 12″ dowel rod, 40 pieces of pink cotton macrame string, and learn a few important knots. This project is for everyone, no matter if you’re new to this or already know a bit about knotting.
We will go over how to pick the right materials and how to put on the finishing touches. Our goal is to make sure you have fun making your macrame project. Let’s start our creative journey! For more help, check out this awesome tutorial here. Are you ready to begin? Let’s go!
Introduction to Macrame
Hello, fellow creators! Ever wondered about macrame and its popularity among DIY fans? It’s a knotting craft that brings style to homes, offering unique decor pieces. Let’s dive into its fascinating world in our article’s third section.
What is Macrame?
Macrame is a craft of tying cords into knots for beautiful patterns. It’s versatile, suited for both experts and newbies. You can make wall hangings, jewelry, and more. Just grab a rod, tape, scissors, and cord to start.
The History of Macrame
Macrame has a rich history dating back to 13th century Arabic weavers. It was used to finish woven items neatly. Sailors later adopted it, making functional and decorative pieces. Today, it’s resurged as a cherished 70s craft, blending tradition and modern style.
Benefits of DIY Macrame Projects
DIY macrame offers more than beautiful decor. It’s a source of joy and peace. Knotting is like meditation, fostering patience and focus. Creating something by hand, like a plant hanger, is rewarding. Plus, you can tailor projects to fit your style perfectly.
| Aspect | Details |
|---|---|
| Popularity | Resurgence as a stylish 70s craft |
| Complexity Level | Considered easier than knitting or crocheting |
| Basic Supplies Needed | Rod, measuring tape, scissors, macrame cord |
| Knot Essentials | Lark’s Head, Square Knot, Double Half-Hitch |
| Project Variability | From earrings to wall hangings |
Interested in the history of macrame or the benefits of DIY macrame? You’re in the right place. Stay with us as we explore the beautiful world of macrame, one knot at a time!
Essential Materials for Macrame
Getting the right materials is key to a macrame project’s success. The right cord and tools are crucial. They shape your piece’s look and function.
Choosing the Right Cord
Finding the perfect macrame cord is vital. Here are your options:
- Cotton Cord: It’s soft and flexible, great for many projects.
- Jute Cord: Rough texture, perfect for a rustic look.
- Nylon Cord: Strong and fray-resistant, good for durable designs.
- Recycled Cotton Cord: Eco-friendly, comes in many colors.
Choose thin cords of 1mm to 2mm for small, detailed work. Use thicker cords of 3mm to 5mm for bigger projects.
Selecting Tools for Your Project
Right tools can make macrame easier. You’ll need scissors, measuring tape, and a board. A macrame board or loom helps with complex designs.
A cord fringe brush smooths out fringes. Fabric stiffeners give extra firmness to some projects.
Additional Supplies You Might Need
Beads and dyes can make your design uniquely yours. You might also want:
- Beads: They come in different sizes and materials.
- Dye: To change the cord color exactly how you like it.
- Embroidery Needle: To add fine details.
If you’re new, try a DIY kit like the Chunky Macrame Handbag DIY Kit. It has everything you need. With the best materials and tools, your creativity will shine in your finished piece.
Basic Macrame Knots and Techniques
Starting with macrame means stepping into a world full of creativity and elegance. First, you need to learn some basic macrame knots. These key techniques boost your confidence and spark your creations.
Macrame knots are incredibly versatile. They help craft complex designs and add personal touches. Knowing these knots makes your projects special. Let’s explore three basic knots crucial for any macrame work.
The Square Knot
The square knot is core to macrame and loved for being simple yet strong. Start by cutting four lengths of cord alike. Use the two outer cords to work with, and the inner ones as filler cords. Cross the left working cord over and under the right working cord.
Then, pull the right working cord under the center cords and through the left loop. Tighten it – that’s the first half done.
To finish, do the reverse. Move the right working cord over and under the left one. The left working cord goes under the center cords and through the loop on the right. Tighten the cords to fix the knot. This square knot tutorial will have you making complex designs quickly.
The Lark’s Head Knot
The lark’s head knot is usually the first one learned. It’s easy and starts many projects. Fold your cord in half to make a loop. Put the loop over a dowel, then pull the ends through and tighten.
This knot not only looks good but is also practical. It’s a great start for your designs.
Moreover, you can adjust the lark’s head knot in many ways, making it flexible for different projects. Change the cord length and position to merge smoothly into complex patterns.
The Double Half Hitch Knot
The double half hitch knot adds elegance and strength to your work. It involves two half-hitch knots on a base cord. First, secure a cord with a lark’s head knot to your dowel. Loop the working cord over the base and through, pulling tight for a half hitch. Do it again for the double half hitch knot.
This knot is perfect for detailed patterns or creating lines. Try it with other knots to add complexity and beauty to your macrame.
Knowing the square knot, lark’s head knot, and double half hitch knot sets you up for success with macrame. Each knot serves a specific purpose and adds a unique touch to your work, making them key for your creative journey.
Planning Your Macrame Wall Hanging
Do you want the perfect macrame piece for your place? Planning is key and shouldn’t be skipped. We’ll look at different designs and make sure it’s the right size. Let’s start creating your dream DIY wall decor.
Choosing a Design Style
First, we need to pick a style that matches your personality and home. Are you all about boho-chic, minimalist, or maybe a colorful mix? Choosing the right style will help your wall hanging blend perfectly with your decor.
“Choosing a style that complements your space will make your macrame wall hanging a seamless addition to your decor.”
We can do anything from simple lark’s head knots to complex square knots. Our creativity is the only limit to our design ideas.
Determining Size and Dimensions
The size of your macrame is important. Small spaces might need 50 feet of cord. Medium spaces could use about 100 feet, and large spaces might go up to 200 feet. Your wall hanging should fit your space and match your design choice.
The length of the cords matters too. For example, we’ll use sixteen 10-foot pieces for 16 lark’s head knots on a 10-inch gold hoop. This step is crucial as we plan more detailed patterns.
Sketching Your Design
Sketching brings our ideas to life! Start by drawing your design. Think about knot symmetry and spacing. This ensures our DIY wall decor is balanced.
Tools like Gingher scissors and high-quality 4 mm cotton macrame rope are essential. Imagine creating 23 rows of alternating square knots. Your sketches will guide you, making sure the end result matches what you envisioned.
Getting Started: Preparing Your Workspace
Start your macrame wall hanging project with the right space. Make a special macrame workspace setup that inspires you. This way, your crafting journey will be both fun and smooth.
Setting Up Your Workstation
Pick a spot in your house for hanging cords straight down. This is key for big projects. For smaller ones, a flat surface works well. Make sure you have space to move easily and that your tools are close by.
Organizing Your Materials
To keep things tidy, sort your cords, tools, and decorations. Put cords on reels or in baskets to avoid knots. Store things like scissors, tapes, and beads in drawers or boxes. A clean space improves work and keeps items in shape.
Safety Tips for Crafting
Stay safe in your macrame workspace setup. Keep the floor free of cords to not trip. Handle sharp tools with care and store them safely. Good lighting is important too. It helps you see better and makes knotting easier.
Getting your materials in order and following safety tips helps for a great macrame time. Now, let’s turn your creative ideas into beautiful wall hangings!
Making Your Macrame Wall Hanging
Making a macrame wall hanging is a fun project for DIY fans. It’s often seen as easier than other crafts because you need just a few simple tools. Here are the steps to create a beautiful macrame wall hanging that will give you a lot of joy. 🧶✨
Step 1: Cutting the Cord
First, you need to measure and cut your cords. For a wall hanging of medium size, you’ll want eight cords. Each should be around 33-35 inches long. Making sure your cords are the same length is important for your design to look even.
Step 2: Attaching the Cord to the Rod
Find a rod or piece of driftwood about 5-8 inches wide. Attach each cord to it using a Lark’s Head Knot. This makes sure your cords are securely tied to the rod. The Lark’s Head Knot is a simple but crucial knot in macrame. It’s used a lot in DIY projects to keep cords in place.

Step 3: Starting with the Base Knots
Now, with your cords ready, start making the base knots. The Square Knot is a great starting point, especially for beginners. Make sure to pull the knots with even tension. This keeps things tidy and professional. Try making a sloping pattern by starting with four Square Knots. Then do rows of three, two, and one knot.
Adding other knots, like the Double Half Hitch Knot, will make your piece more interesting. Make two rows of these, each going in opposite directions. These knots add texture and depth to your work.
Feel free to play around with different patterns or add details like wood beads. You can use a yarn needle for beading, too. Following these steps, making a macrame wall hanging can be a fun and creative experience.
Creating Patterns in Your Design
Designing your macrame wall hanging is more than just tying knots. To make your piece stand out, consider different macrame patterns. Mixing various knots gives unique textures and designs. Let’s explore creative ways to improve your macrame.
Mixing Knots for Variation
Incorporate different knots to diversify your macrame wall hanging. The Square Knot is easy and great for consistent patterns. The Lark’s Head Knot adds intricacy effortlessly. For more complex designs, try the Double Half Hitch Knot for better cord control. Mixing knots creates a dynamic visual effect.
Adding Color and Texture
Adding color is a great way to introduce texture. Consider dip-dyeing your cords for a gradient effect. Using various cord types, like cotton, linen, or hemp, adds texture. This adds visual and tactile diversity, making each piece unique.
Using Beads and Other Embellishments
Beads, feathers, and seashells can add charm to your macrame. Weaving beads into macrame creates a personalized look. You can place beads uniformly or staggered to break up knotted sections. Make sure the beads are secure and experiment with different shapes and materials.
For more design inspiration, check out this comprehensive guide on creating custom macrame. By mixing knots, adding color and texture, and using embellishments, you can turn a basic macrame into art. Let’s get creative with your macrame designs!
Troubleshooting Common Issues
Even those who are great at crafts can run into problems with macrame projects. But don’t worry, solving these issues can be simple. Here, we’ll go over some usual troubles and how to fix them with ease.
Dealing with Tangled Cords
If you’ve done macrame, you know tangled cords can be frustrating. To deal with them, start by loosening the small knots gently. Then, untangle each knot one by one. Don’t try to fix the whole mess at once. A comb or your fingers can smooth out the cords without harming them.

Fixing Uneven Tension
Uneven tension can make your design look off. To fix this, gently pull the cords to even out the tension. This action can balance out the knots. Remember, keeping your pressure consistent is crucial. Different pressures mean uneven knots.
Correcting Mistakes in Knots
When making macrame pieces, it’s normal to make mistakes. But there’s good news: fixing these mistakes is not hard. Just untie the wrong knots and redo them. Make sure each knot is tight and in the right spot. Take your time to avoid harming the cord or making things worse.
- Most macrame projects use a 3 mm cotton macrame cord.
- Make sure cords are the right length. For example, you might need 18 cords, each 10 feet long.
- Keep an eye on your rows: the first might have 9 square knots, and the second, 8.
Remember these pointers for a better macrame crafting experience.
Finishing Touches for Your Wall Hanging
Finishing your macrame piece feels great. Paying attention to the end details makes it beautiful and long-lasting. Let’s look at trimming cords, adding something to hang it by, and keeping it looking good.
Trimming Excess Cord
Once you’ve knotted and patterned, trim the extra cord. Use sharp scissors to avoid fraying and trim evenly for a nice look. This makes your design soft and visually appealing.
Adding a Hanging Mechanism
Now, we attach a mechanism to hang it. You can use a strong cord or a dowel with hooks. Make sure it can hold up your macrame wall hanging.
Sealing and Protecting Your Macrame
To keep your macrame looking new, seal and protect it. Using a fabric sealant guards against dust and sun. It’s important if your piece is in a busy spot.
Inspirational Macrame Project Ideas
Welcome to the world of macrame where creativity meets functionality! We’ve been hosting workshops and sharing macrame project ideas for three years. We’ve found many beautiful designs and seasonal favorites.
Modern Boho Styles
Dive into the modern boho macrame styles that fit today’s looks. Imagine a sleek wall hanging or a trendy floating shelf with fancy knots. These pieces add a cool, yet classy feel to any room.
With six 15-feet long cotton cords, you can make an eye-catching plant hanger. This has become very popular in our community!

To start, it’s key to learn basic knots like the square knot and double half hitch. Also, use practical tools like metal rings and S hooks to make the project stronger and easier.
Nature-Inspired Designs
Embrace nature with macrame designs inspired by the outdoors. Include things like leaves, flowers, and natural colors in your work. A nature-themed door hanging is perfect for beginners. It only needs 4 yards of 0.5mm Chinese knotting cord and some metal rings.
For those more experienced, a non-lighting macrame chandelier looking like a grand tree branch is beautiful. It adds elegance to your space.
Seasonal Themes for Decor
For seasonal macrame projects, consider holiday ornaments or festive wreaths. Our macrame ornaments are a big hit during the holidays. They add a personal touch to your celebration.
Use materials like thicker cotton cords to make them stand out. Create pieces reflecting the seasons—like bright designs for summer or cozy snowflakes for winter. These projects keep your decor fresh and offer a fun creative outlet all year.
Here’s a quick table to help you pick the perfect macrame project for any mood or occasion:
| Project Type | Description | Materials Needed |
|---|---|---|
| Wall Hanging | Modern boho style with intricate patterns | 6 cotton cords (15 feet each), wooden ring |
| Plant Hanger | Stylish and functional for indoor plants | Metal ring, thicker cotton cords |
| Ornaments | Seasonal small designs perfect for holidays | Thicker cotton cords, decorative beads |
| Door Hanging | Easy beginner project, great for welcoming decor | Chinese knotting cord, metal ring |
Showcasing Your Wall Hanging
After creating your macrame piece, it’s time to show it off. The right spot can make your decor pop and feel welcoming. Look for places with natural light or where it matches your home’s vibe, like living rooms or entryways.
Best Placement in Your Home
Ideal spots have plenty of natural light. Hanging your piece in the hallway or living room adds a special touch. It blends well with cozy elements like cushions. To keep it bright, avoid direct sunlight to prevent fading.
Pairing with Other Decor Styles
Fitting macrame with your home decor is easy with our tips. It suits many styles, from boho-chic to modern looks. Match your macrame’s colors with your room for a unified style. Use neutral colors to blend easily, or bright ones for a standout look. Mixing textures, like wood or metal, adds contrast.
Caring for Your Macrame Piece
Regular care keeps your macrame looking great. Dust gently to maintain its look. Tighten any loose knots carefully. Ensure hanging spots are secure to avoid falls. With the right care, your macrame will beautify your home for a long time.
Macrame Community and Resources
Joining the macrame community boosts your creativity and enjoyment. You’ll find plenty of online lessons and workshops to get involved in. These opportunities help and inspire you along the way.

Online Communities and Forums
Online spaces are great for meeting others who love macrame. On sites like Reddit and Facebook, people share tips, show off their creations, and get help. You can even find virtual workshops to learn macrame without leaving your house. This online community keeps you inspired and connected with friends who share your interest.
Books and Tutorials for Further Learning
Looking to get better at macrame? Books and tutorials are here to help. “Macramé: The Craft of Creative Knotting for Your Home” by Fanny Zedenius is perfect for all levels. Not to mention, YouTube and blogs have tons of how-to videos and posts. They make learning new things easy and fun.
Local Workshops and Classes
Prefer learning by doing? Check out macrame workshops near you. Craft stores and community centers often host classes. It’s a chance to learn, meet other fans, and even make new friends. Workshops connect people who love macrame, making it easy to share ideas and stories.
Being part of the macrame community is great, whether you’re online or face-to-face. It helps you grow creatively and learn new things. No matter your level, these resources make sure you’re not alone in your macrame adventure.
Frequently Asked Questions (FAQs)
Starting out in macrame can bring up a lot of questions. We collected common macrame FAQs to assist you.
What Beginners Should Know?
If you’re just beginning, start with easy designs. Then, work your way up to complex ones. The Small Beginner Wall Hanging Macrame Kit is perfect for starters. It comes with 60 meters of 4-strand, 3mm macrame rope. Also, a step-by-step 19-page pattern book is included to help with your projects.
How Long Does It Take to Create a Piece?
Creating a macrame piece’s time varies. It depends on the complexity and size. The DIY Macrame Plant Hanger Kit is an example. It fits a pot size from 4 to 8 inches and is about 3.5 feet long. Simple projects take a few hours, while complex ones may take several days.
Can I Use Alternative Materials?
Yes! While kits often come with 100% cotton rope, you can try different materials. Hemp, leather, or yarn are options for a new look and feel. Using sustainable materials like upcycled fabrics or natural fibers makes your piece unique.
Looking for more ideas and macrame FAQs? Connect with a community of macrame lovers. They share DIY tips that can inspire your creativity. Enjoy your crafting journey!
Conclusion: Embracing the Art of Macrame
We hope this guide makes you want to try macrame. It’s an ancient art that combines tradition with modern style. It’s perfect for anyone looking to add a personal touch to their home.

Encouragement for DIYers
Each knot is a step towards becoming better at this art. Enjoy the process and don’t hurry. Mistakes like tangled cords or uneven knots are part of learning.
The best part about DIY macrame is there’s no wrong way to do it. It’s all about growth and being creative. So, pick up your cords and let your creativity flow!
Sharing Your Creations
Sharing your macrame projects can be very rewarding. Post them online or join community forums to inspire others and get feedback. Connecting with people who love macrame as much as you do is awesome.
Don’t be afraid to show off your work, including the ups and downs. It makes crafting even more special!
Continuing Your Macrame Journey
Your macrame adventure doesn’t stop with one project. There’s always something new to learn or try. See macrame as an ongoing journey.
Look into local classes, online guides, or books on more complex knots. The world of macrame has so much to offer. Keep making knots, creating, and most importantly, enjoying it!
Additional Resources
Starting your macrame journey is exciting, and we’ve got everything you need. Check out macrame tutorials online for the best tools and materials. This will set you up for a great DIY adventure.
Links to Online Tutorials
Explore the macrame world with great online tutorials. There are 21 free patterns for beginners that include written and video guides. Whether you’re new or want to get better, these resources are perfect for everyone. Plus, with memberships like Lia Griffith, you’ll have over 2,000 projects to explore.
Recommended Tools and Supplies
Picking the right tools and supplies is key for your macrame projects. A three-strand rope holds knots well, and single-strand is great for fringe. Have a mix of wooden dowels, copper pipes, or driftwood for hanging. Also, using a level helps keep your work straight. These recommended supplies will make your crafting smoother and improve your work’s quality.
Inspiration from Macrame Artists
Getting ideas from skilled macrame artists can boost your creativity. Look at artists who are redefining macrame with new and exciting designs. Their work can inspire your own, pushing you to try different knots, patterns, and materials. By learning from these artists, you’ll be making beautiful unique wall hangings quickly.