There’s something magical about crisp mornings and golden afternoons that makes us want to bring the outdoors in. I’ll never forget the first time I gathered pinecones and maple leaves during an autumn walk—their earthy scent and vibrant hues felt like nature’s invitation to create. That’s when I realized: seasonal decor isn’t just about aesthetics. It’s about celebrating the rhythm of the year with pieces that whisper, “You’re home.”
We’ve all felt that cozy pull to make our spaces reflect the world outside our windows. Maybe you’ve admired fiery red branches on your driveway or tucked a sprig of berries into your pocket “just because.” Those moments? They’re the heart of crafting meaningful decorations. Your front door deserves more than store-bought plastic—it deserves a story.
Let’s explore how to turn backyard treasures into showstopping pieces that welcome guests with warmth. From choosing textures that last through November’s chill to arranging colors that glow like sunset, you’ll learn to design arrangements that feel alive. Best part? You don’t need fancy tools or a craft-store run—just your two hands and nature’s free supplies.
This isn’t just about making pretty things (though you’ll do plenty of that!). It’s about creating traditions that return every year, like old friends. Ready to transform seasonal magic into something you can hold?
Introduction to DIY Fall Wreaths Using Natural Elements
Picture this: your front entryway glowing with colors that mirror the changing trees. That’s the power of seasonal crafting. Unlike mass-produced decor, handmade creations carry whispers of rustling leaves and woodsmoke mornings right to your doorstep.
The Heartfelt Appeal of Seasonal Designs
These arrangements do more than beautify—they tell stories. A pinecone from your child’s nature walk or berries from your backyard becomes part of your home’s narrative. Each piece reflects personal style while celebrating nature’s temporary artistry.
Nature’s Toolkit Beats Store-Bought
Why settle for plastic when twigs crackle underfoot and dried flowers smell like sunshine? Real materials age gracefully, their colors softening like twilight. They’re budget-friendly, eco-conscious, and spark joy every time you reach for the doorknob.
Best part? Gathering supplies becomes its own adventure. You’ll notice details you’d usually miss—the velvety underside of a leaf, how acorn caps fit like puzzle pieces. These small discoveries make your creation truly one-of-a-kind.
Gathering Natural Materials for Your Wreath
The hunt begins where your morning coffee steam meets the dew on your lawn. Your backyard holds hidden treasures perfect for crafting—you just need to look closely. Start by walking slowly through your garden, letting your eyes linger on textures you’d normally pass by.

Exploring Your Garden for Supplies
That hydrangea bush? Its dried blooms add rustic charm. Overgrown rosemary? Snip a few sprigs—their silvery greenery smells like earth and spice. Even vegetable patches offer surprises: twisty okra pods or artichoke husks make striking accents. Keep a basket handy to collect berries, feathery grasses, and seed heads that catch the light.
Foraging Outdoors for Unique Finds
Public parks and wooded trails become goldmines with permission. Seek out velvety eucalyptus leaves or pinecones still sticky with resin. Remember: take only what you’ll use, leaving enough for wildlife. A good rule? Never strip a plant completely—harvest from multiple sources instead.
Back home, lay your finds on newspaper. Mist delicate leaves with water to revive them, and let woody stems dry overnight. This prep work ensures your wreath stays vibrant longer. Pro tip: combine sturdy base materials like grapevines with softer greenery for contrast that lasts through the season.
Essential Tools and Supplies for Fall Wreath Making
Imagine your workbench glowing with possibilities—this happens when you’ve got the right companions for your creative journey. You’ll need a few trusty tools to turn foraged treasures into lasting beauty. Let’s unpack what truly matters in your crafting toolkit.
Your Three Crafting Champions
A hot glue gun becomes your secret weapon—it’s like having an extra pair of hands. Pair it with floral wire and sharp wire cutters, and suddenly those stubborn branches behave. Pro tip: Use thicker wire for pinecones, thinner for delicate leaves.
Smart Shopping Strategies
Dollar stores hide gems! Grab faux berry sprigs or neutral filler greens there—they’ll blend perfectly with real foliage. Stock up on glue sticks during back-to-school sales. For ribbon, check remnant bins at fabric stores—you need just 18″ for a bow!
Finishing Touches That Wow
Velvet ribbon adds luxe texture, while burlap keeps things rustic. Try mixing widths—a thin satin strip layered under chunky jute creates depth. Bonus: Attach ribbons with safety pins instead of glue for easy seasonal swaps!
| Tool | Purpose | Pro Tip |
|---|---|---|
| Hot Glue Gun | Securing lightweight elements | Use low-temp setting for delicate materials |
| Floral Wire | Anchoring heavy items | Twist two strands for extra strength |
| Wire Cutters | Trimming stems & wire | Keep a magnet nearby to catch metal bits |
| Decorative Ribbon | Final polish | Pre-make bows on hair clips for easy attachment |
These tools become old friends—the more you use them, the more they’ll surprise you. That glue gun? It’ll fix broken ornaments come December. Those wire cutters? Perfect for spring garden projects. Build your kit slowly, and watch your confidence grow with each creation!
Choosing the Perfect Wreath Base
Your creation’s foundation determines its character and longevity. While browsing craft stores, you’ve likely faced two options: the wild charm of twisted branches or the clean lines of manufactured shapes. Let’s unravel which choice brings your vision to life best.

Grapevine versus Traditional Wreath Form
Grapevine bases feel like shaking hands with nature itself. Their knobby texture adds instant depth, letting you tuck stems between twists without glue. I’ve reused mine for three seasons—just pluck out autumn elements come December and add pine sprigs!
Traditional wreath forms work better for symmetrical designs. Foam rings hold artificial flowers securely, but they lack that earthy vibe. One crafter friend calls them “blank canvases for glitter,” while grapevine whispers “forest walk.”
| Feature | Grapevine | Traditional Form |
|---|---|---|
| Texture | Organic, dimensional | Smooth, uniform |
| Cost | $5-$12 (reusable) | $8-$20 (single-use) |
| Attachment | Wedging & twisting | Glue & pins required |
| Style Match | Rustic, bohemian | Modern, structured |
Size matters too! A 14-inch grapevine circle suits most doors, while 18-inch forms make bold statements. Pro tip: Hold potential bases against your entryway from 10 feet away. Can you see the shape clearly? That’s your winner.
Step-by-Step Guide to Crafting Your Wreath
Let’s roll up our sleeves and turn those gathered treasures into something extraordinary. I still remember my first attempt—fumbling with stems while glue strings danced like spiderwebs. Now? We’ve perfected a method that’ll have you grinning at your masterpiece in under an hour.

Preparing and Organizing Your Materials
Spread everything on a cleared table—this becomes your creative command center. Sort stems by length: long ones form the backbone, medium pieces add body, and short sprigs fill gaps. Pro tip: Mist delicate leaves lightly to keep them flexible during assembly.
Design Layout and Layering Techniques
Start with your longest branches, tucking them deep into the base at 10 and 2 o’clock positions. This creates natural movement. Add medium stems next, angling them outward like sunrays. Finish with tight clusters of berries or seed pods for focal points.
“Always work in odd numbers—three pinecones here, five leaves there. It tricks the eye into seeing abundance.”
Securing Elements with Glue and Wire
Heavy items like acorns need wire twisted around their bases before attaching. For lightweight elements, a pea-sized drop of glue holds firm. Test each piece by gently shaking the arrangement—if something wobbles, reinforce it with both materials.
| Element Type | Best Attachment | Drying Time |
|---|---|---|
| Woody Stems | Floral Wire | Instant |
| Dried Flowers | Hot Glue | 30 seconds |
| Berries | Wire + Glue | 2 minutes |
Finish with a bow cut 50% longer than you think—it compensates for volume loss when tying. Step back every few minutes to check balance. Your front door will soon boast a wreath that looks store-bought (but we’ll keep your secret!).
Incorporating Seasonal Decor Elements
The crunch of acorns underfoot and the spicy scent of cinnamon bark—this is where your wreath truly comes alive. Now comes the fun part—transforming your base into a masterpiece that captures autumn’s essence! Think of this stage as painting with nature’s palette, where every pinecone and berry adds depth to your story. We love how these touches make each creation uniquely personal, just like the ideas we share in our guide to nature-inspired home accents.

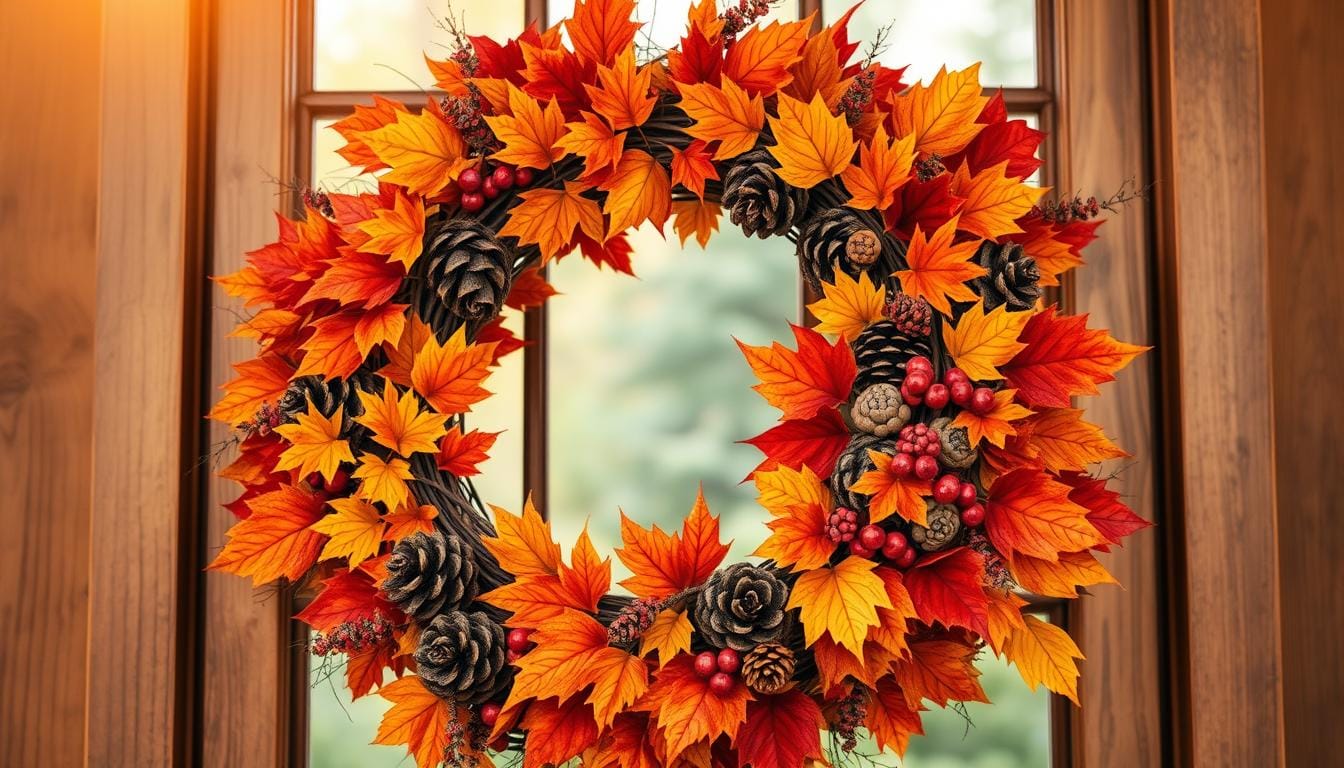
Pinecones, Leaves, and Berries for Texture
Start with pinecones—nature’s ready-made texture bombs. Nestle them in clusters of three around the base, varying sizes for visual rhythm. Foraged maple leaves in crimson and amber? Fan them like overlapping feathers. Pro tip: Wire each stem before tucking it into grapevine twists—they’ll stay put through windy days.
Berries are your secret weapon. Scatter them sparingly between clusters—their bright pops guide the eye around the circle. We’ve found that mixing dried and faux berries adds dimension without weight. Just avoid placing them near the top—they’ll sag first in rain!
Adding Pumpkins and Gourds for a Fall Touch
Mini pumpkins steal the show when placed strategically. Choose ones no bigger than a clementine, and hot-glue them last for perfect positioning. Mix smooth-skinned varieties with bumpy gourds—their contrasting surfaces mirror autumn’s unpredictable charm.
Want longevity? Use faux pumpkins with real stems attached. They’ll look freshly picked through Thanksgiving. Place one at the wreath’s base as a focal point, then tuck smaller ones among leaves. The result? A harvest celebration that whispers, “Welcome home.”
Creative Variations for Unique Wreath Designs
Your front door deserves more than a standard circle of leaves—it craves personality. Let’s explore how to transform basic shapes into artistic statements that spark joy. Whether you lean toward sleek minimalism or cozy farmhouse charm, nature’s materials adapt beautifully to your vision.

Personalizing with Monograms and Custom Touches
Twist grapevines into your family’s initial for instant recognition. Bend wire around twigs to form letters, then weave dried flowers through the gaps. One clever way to preserve memories: attach small photos to cinnamon sticks with clothespins!
Try these ideas for custom flair:
- Press autumn leaves between clear acrylic sheets as hanging charms
- Weave ribbon through the base spelling “Gather” or “Welcome”
- Hot-glue vintage keys or heirloom buttons near the bow
Modern Versus Rustic Design Styles
The same pinecone becomes two different stories. For contemporary designs, spray-pick them gold and arrange in geometric patterns. Rustic lovers? Leave them natural and cluster with burlap strips.
| Style | Materials | Color Palette |
|---|---|---|
| Modern | Copper wire, succulents, pampas grass | Neutrals + metallics |
| Rustic | Twine, dried corn husks, acorns | Earth tones + cream |
Break tradition with shape experiments! Triangle bases made from bundled sticks feel fresh, while square frames wrapped in eucalyptus offer clean lines. Our favorite idea? Hang a circular wreath inside a larger square frame for dramatic contrast.
For more inspiration on seasonal arrangements, explore our guide to festive holiday arrangements. Remember—your home’s aesthetic should whisper through every berry cluster and curled ribbon!
Tips for Using Reusable and Sustainable Bases
What if your wreath base could evolve with the seasons? Grapevine forms answer this beautifully—their twisted branches become trusted partners in your creative journey. Unlike disposable options, these bases grow more character with each reuse, saving money while honoring our planet.
Advantages of Grapevine Wreaths
Grapevine’s magic lies in its flexibility. When winter arrives, gently pluck out autumn leaves and berries. The base remains intact, ready for pine sprigs or holly. We’ve found one quality grapevine circle lasts 5+ years—that’s 20 seasonal transformations!
Store your base in a breathable cotton bag between projects. This prevents mold while letting air circulate through the woody twists. For stubborn glue remnants, use tweezers to pick them off without damaging branches.
| Feature | Grapevine | Disposable Base |
|---|---|---|
| Lifespan | 5+ years | Single season |
| Cost per Use | $1 (after 5 years) | $8-$15 |
| Eco-Impact | Zero waste | Landfill-bound |
Year after year, you’ll notice subtle changes—the way sunlight deepens the wood’s patina or how new stems nestle into existing grooves. This living quality makes each arrangement feel like a collaboration with nature itself.
Pro tip: Photograph your wreath before disassembling. Next year, you’ll have inspiration to try fresh color combos while keeping favorite elements. Your grapevine companion? It’ll be waiting, ready for its next chapter.
DIY Fall Wreaths Using Natural Elements
Ever watched sunlight dance through amber leaves and thought, “This belongs on my door”? Let’s explore how ordinary backyard finds transform into extraordinary statements. We’ll walk through five approaches that turn nature’s gifts into art.
Herb arrangements do double duty—hang rosemary and thyme near your kitchen window. Snip sprigs while cooking! Their earthy fragrance deepens over weeks, unlike store-bought potpourri.
For lasting scent, try eucalyptus paired with incense cedar. These sturdy greens hold their aroma through November rains. Tuck dried citrus slices between branches for pops of color that age beautifully.
“My succulent wreath thrived all winter—just mist it weekly!”
Living designs with hens-and-chicks plants need minimal care. Nestle cuttings into moss-lined frames, securing with floral pins. They’ll root within weeks, creating evolving art that outlasts the season.
Combine textures for showstopping results:
- Twist wheat stalks around grapevine bases
- Layer crimson maple leaves over acorn clusters
- Dangle okra pods painted with clear sealant
See how light plays with materials at different times? Morning sun highlights velvety seed heads, while twilight softens berry tones. Your creation becomes a living painting that changes daily.
Front Door Decoration Ideas with Fall Wreaths
Your entryway whispers before guests even knock—that’s the power of thoughtful arrangement. Let’s make that first impression sing with smart placement and cohesive styling.
Arranging Wreaths for Maximum Visual Impact
Size matters most here. A good rule? Match your wreath’s diameter to two-thirds of your door’s height. Oversized designs command attention on tall entries, while smaller ones charm cottage-style homes.
Hang it at eye level using wide ribbon—this lifts the display and adds movement. We love looping satin through a Command Hook flipped upside-down on the door’s interior. Pro tip: Knot the ribbon’s ends for a polished finish that survives windy days!
Complementing Home and Porch Decor
Your creation should converse with its surroundings. Pull colors from nearby planters or outdoor pillows. If your fall porch features burnt orange mums, echo those tones with dried magnolia leaves in your arrangement.
Try these pairings:
- Rustic burlap wreaths with galvanized metal lanterns
- Berry-adorned designs beside plaid welcome mats
- Neutral grapevine circles flanked by potted ornamental grasses
“Swap ribbons seasonally—a chunky knit strip for winter, gingham for spring—to keep your entry fresh year-round.”
Step back often while decorating. Your front door should feel like the opening line of a great story—inviting, balanced, and utterly you.