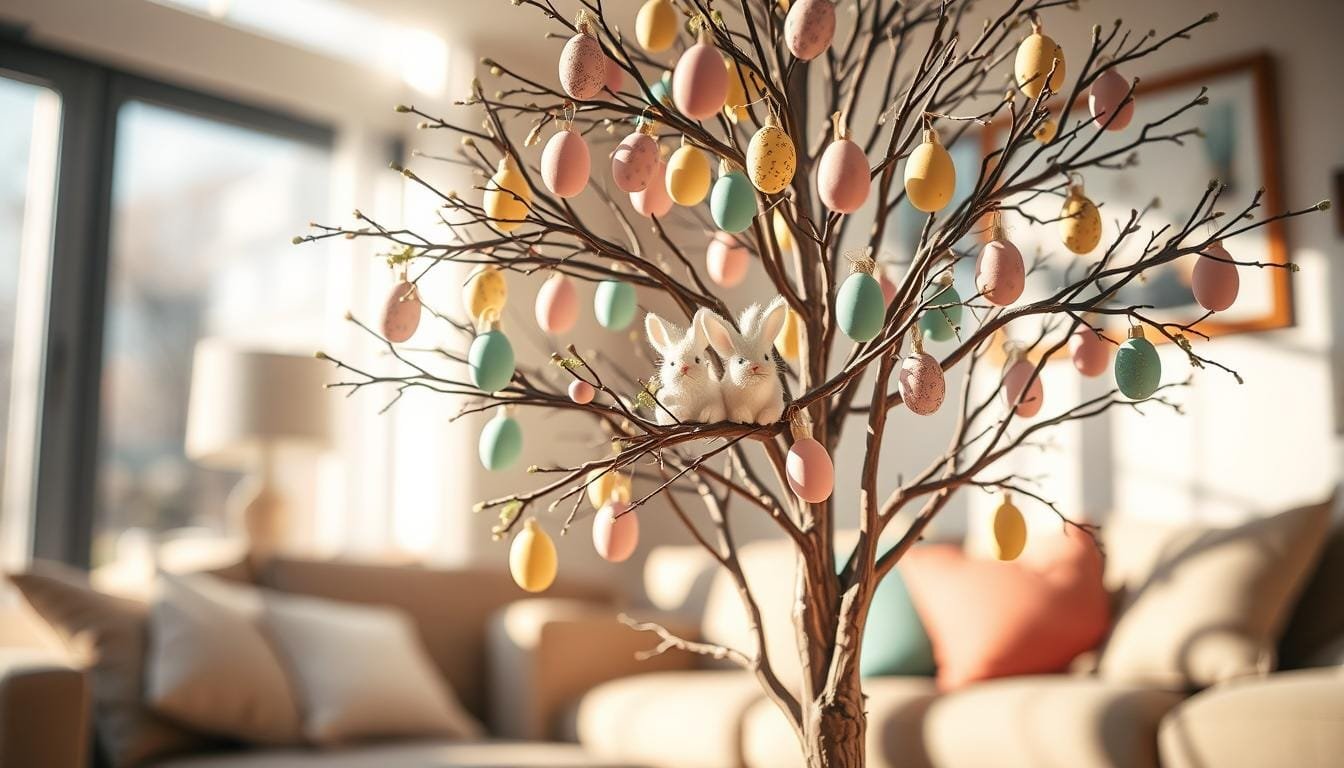
Ever wake up and, with your morning coffee in hand, think about adding Easter joy at home? Last spring, my family made a DIY Easter Tree. It was magical! Picture this: a tree adorned with colorful mini eggs and cute bunnies. It was the highlight of our Easter.
One afternoon, we sat around the table with wooden eggs, ribbons, and bunny figures. We used a grapevine branch to make our Easter tree. The kids loved painting the eggs. Seeing it come together was exciting. This project brought us colors, joy, and lovely family memories.
Making your own DIY Easter Tree is not just crafting. It’s about fun, creativity, and spending time together. You can use items like branches, plastic eggs, or bunnies. It’s easy, inexpensive, and fun.
This guide will show you how to make your Easter tree, from start to finish. Ready to bring Easter magic into your home? Let’s start!
### Additional text outside HTML tags:
Harness the power of DIY, create your enchanting Easter tree adorned with mini eggs and bunnies, and immerse in the festive spirit!
Introduction to DIY Easter Trees
Decorating your home with an Easter tree is a delightful way to celebrate the season. It brings color and life into your living space. You can create a personal touch to your holiday decor with various Easter Tree Decor Ideas. Let’s explore the meaning and inspiration behind these charming decorations!
The Significance of Easter Decor
Easter trees symbolize new beginnings and life, fitting perfectly with the season’s themes. The Easter egg tree tradition started in pre-Christian Germany. It’s now a beloved Easter celebration worldwide, from the U.S. to Australia. In 2017, Brazil showcased the largest Easter egg tree with 82,404 painted eggs.
Why Create an Easter Tree?
Creating an Easter tree is a great way to bond with family and express creativity. You can use eggs made of real shell, plastic, wood, or glass. Add Mini Eggs, bunnies, and spring ornaments for fun. Surprisingly, 80% of DIY fans feel proud and happy making their holiday decorations.
Choosing Your Easter Tree Base
Picking the perfect base for your Easter tree is very important. It gives the tree its shape and beauty. Depending on what look you want and how much you can spend, there are many choices.
Types of Tree Bases for DIY Projects
Using natural branches, like those from dogwood or willow trees, adds a natural feel. If you prefer something easier to work with, you might like styrofoam or paper mache cones. Each option has its own unique charm and fits different styles.
Think about how easy it is to add Easter Tree Ornaments to your choice. For example, cardboard cones can be trimmed to any size. This makes your Easter Tree project very flexible.
Where to Find Affordable Options

Keeping costs low is important. You can find many materials for your tree base for cheap or even free. Look in your garden, or buy at low prices from local stores or florists. Sales out of season are also great for finding deals.
Dollar stores are great for finding inexpensive tree bases, like glass vases or decorative tins. This way, you can save money and still make something beautiful. Your DIY Easter Tree’s base doesn’t have to cost a lot to look great!
Selecting Mini Eggs for Decoration
Choosing the right mini eggs can make your DIY Easter Tree special. You can pick craft mini eggs or real eggs. Craft ones are made from stuff like wood or plastic. They last long and you can use them again. Real eggs, though, can be emptied and painted. This adds a special touch to your tree. Just think about what goes best with your Easter theme.
Materials: Craft vs. Real Eggs
Thinking about mini eggs for your tree? You might wonder if craft or real eggs are better. Craft eggs are tough and can be designed in many ways. They’re made from wood or plastic. Real eggs give your decorations a true feel. You can paint or dye them to make unique ornaments. This shows off your creative side.

Choosing real eggs can mean more work and care is needed. Hollowing and painting them takes hours. A single DIY tutorial on speckled egg ornaments could last over an hour. Keep this in mind if you want to make Mini Eggs Crafts with kids.
Color Palettes for Mini Eggs
A DIY Easter Tree looks best with a matching color scheme. Think about adding mini eggs in colors that fit your decor. Easter colors often include soft pinks, blues, greens, and oranges. Flowers and speckled eggs in these colors can make a beautiful centerpiece. Stores like Michael’s and Home Goods have lots of choices for your theme.
Want your Easter Tree Ornaments to shine? Try playing with patterns and textures. Adding polka dots, stripes, or marbled looks can make your eggs more interesting. Have fun and let your creativity flow. This will make your Easter egg tree a wonderful part of your home. 🎨
Incorporating Bunny Figurines
Putting bunny figures on your Easter tree makes it look more festive and fun. You can find bunny decorations in many styles and materials. This lets you make your Easter tree unique.
Types of Bunny Decor
There are many fun types of bunny figurines to choose from:
- Soft Plush Bunnies: Great for a cozy feel on your DIY Easter Tree. Kids love these soft toys, and they can keep them as special gifts.
- Ceramic Bunnies: These come in different colors and styles. They add a fancy touch that adults love.
- Wooden Bunnies: They bring a natural vibe to your decor. It’s a good choice for those who like eco-friendly decorations.
Sizing and Placement Tips
Here are some tips for arranging your bunny decorations:
- Hang small bunny figures on the top branches. This way, they stand out and look adorable.
- Put large bunny figures near the bottom or on strong branches. This stops the tree from tipping and looks nice.
- Spread different sized bunnies all over. This keeps the tree interesting. Use hooks or ribbons to hang them well.
Using different bunny decorations makes your Easter tree more engaging. Each bunny helps create a charming and unified look.
DIY Easter Tree Assembly Steps
Making a DIY Easter Tree is fun and makes your home look nice. We will show you what you need and how to build it. This way, your Easter tree will look amazing.
Essential Tools and Materials
First, collect all the items you need:
- Pruning shears for trimming natural branches
- Floral foam for stable support
- A wooden dowel (12 inches)
- A half-circle Styrofoam base (6 inches)
- A wooden box, larger than the foam circle
- Naturally wired strips (approximately 15 inches)
- Additional trunk wire (6 inches longer than the natural strips)
- Optional artificial cherry blossoms
- Decorations like mini eggs, bunny figurines, and ribbon (recommended 1/8 inch for egg ornaments)
- Filler materials to cover the base after adding moss
Step-by-Step Assembly Guide
Putting together your DIY Easter Tree is simple from start to end. Let’s go over each step:
- Prepare Your Base: Begin by fixing the floral foam in the wooden box for a solid base.
- Insert the Wooden Dowel: Put the dowel in the middle of the foam. Make sure it’s straight and tight.
- Wrap the Branches: Use wired strips for the main branches. Decide how many based on what you like.
- Assemble the Trunk: Join extra trunk wire to the dowel to make it longer. Check its stability.
- Add Decorations: Hang items like mini eggs and bunny figures on the branches. Use real or fake flowers too. The egg stands for life, great for celebrating Spring.
- Final Touches: Fill the box with materials, then add moss. Place decorations well and secure them.

By using the recommended tools and materials, you will know How to Make an Easter Tree. It will be beautiful, strong, and last a long time. Enjoy this fun DIY Easter Tree project.
Creative Decorating Ideas for Mini Eggs
Mini Eggs can make your Easter tree festive and colorful. Here are some ideas to get creative!
Patterns and Designs to Try
You can make many patterns and designs. Paint geometric patterns or use floral motifs. Or, use colorful tissue or scrapbook paper on your eggs.
For example, using floral tissue paper and typewriter pattern scrapbook paper creates two distinct looks, adding variety to your Easter tree decor.

Painting eggs is fun for the family. Dots, thin lines, and marbled effects are easy and popular.
Unique Ways to Display Mini Eggs
To display your eggs, hang them with ribbons. Use pastel-colored ribbons and tie them at different heights for beauty.
Nestle your eggs in DIY nests. Use twigs, branches, and moss to make nests on your tree.
- Displaying with Ribbons: Simple yet elegant, hanging eggs with ribbons lets them dangle and catch the eye.
- Nesting them: Adds a touch of nature to your decor, giving it an earthy feel.
Mini Eggs Crafts are fun and customizable. With creativity, your Easter tree will stand out as unique and festive!
Enhancing Your Tree with Ribbon and Bow
Ribbons add a beautiful splash of color to your DIY Easter Tree. You can make your Easter tree special with the right ribbons and bows. It will look elegant and inviting.

Best Ribbons for Easter Themes
For your Easter tree, pick soft and bright ribbons. Choose silk, satin, and grosgrain for a fancy look. Look for ribbons with dots and flowers for a perfect Easter feel.
- Pastel Colors: Soft pinks, yellows, and blues that evoke the essence of spring.
- Patterns: Polka dots, stripes, and floral motifs that add visual interest.
- Textures: Satin and grosgrain for a touch of sophistication.
Pastel colors are a big favorite for Easter, loved by 70% of folks. They make the decorations bright and match Easter eggs and bunnies well.
How to Tie Decorative Bows
Tying bows for Easter can be easy with a bit of practice. Pick a ribbon that keeps its shape. Here are the steps to make a perfect bow:
- Cut the ribbon to your desired length, usually around 24 inches.
- Make two loops, one with each end of the ribbon.
- Cross the loops and pull one through the center to create a knot.
- Adjust the loops and tails until the bow looks balanced and symmetrical.
- Secure the bow onto the tree using floral wire, ensuring it sits snugly against the branches.
Adding ribbons and bows will make your tree stand out this spring. It brings joy and lets your creativity shine through. Your tree will become a beautiful spring focal point.
Adding Natural Elements to the Decor
Using natural elements can make your Easter Tree Decor Ideas really stand out. Fresh flowers and green plants bring colors of spring into your space. With flowers like tulips and daffodils, your DIY Easter Tree will look and feel lively.
Using Flowers and Greenery
Adding flowers is key to enhancing any decor. Choose spring flowers like daffodils and tulips, or maybe eucalyptus. These add beauty and a nice smell to your place.
For better flower decor, follow these tips:
- Mix and Match: Use various flowers together for a colorful look.
- Layering: Put flowers at different levels to add texture.
- Water Supply: Keep flowers fresh with water tubes, especially during Easter.
Incorporating Twigs and Branches
Twigs and branches add a rustic touch to your DIY Easter Tree. They make your decoration look fuller and more elegant. Choose branches that are strong yet flexible for the best look.
Here’s how to add twigs and branches nicely:
- Selecting the Right Branches: Find branches that match your Easter tree’s colors.
- Spacing: Hang ornaments carefully, with 2-3 inches of space to avoid clutter.
- Accents: Add small decor like mini nests or moss balls for a natural theme.
Natural decor is becoming more popular, making homes feel warmer by 40%. Using fake branches is also great for DIY Easter Tree fans. It looks good and is better for the planet.
Adding these Easter Tree Decor Ideas will make your Easter look great. It brings a sense of renewal to your home.
Lighting Your Easter Tree
Adding lights to your Easter tree makes it magical. The right lighting shines on your cool decorations. It also gives a warm, welcoming feel. Here are some tips and rules for lighting your DIY Easter Tree.
Choosing the Right Lights
Choosing great lights changes your tree’s look. We suggest small LED lights. They are safe and come in many colors. You can match them to your decor theme easily. Here are some top lighting choices:
| Light Type | Benefits | Recommended Use |
|---|---|---|
| String Lights | Flexible, easy to install | Wrapping around branches |
| Fairy Lights | Delicate, adds a magical touch | Interspersed for a glowing effect |
| Battery-Operated Lights | Wireless, adaptable | Areas without nearby outlets |
Fairy lights are loved for their whimsical touch. They’re great for Easter trees. See them in these holiday lighting ideas.
Safety Tips for Using Electric Lights
Safety comes first with lights. Here are some key tips:
- Secure Installations: Make sure everything’s safely attached.
- Avoid Overloading Sockets: Don’t put too much on one outlet.
- Keep Wires Hidden: Keep wires away from kids and pets.
- Regular Checks: Always check for damaged wires or lights.
For fun ideas, look at these DIY bunny ornaments. They add charm to your Easter tree.
Use these Easter Tree Decorating Tips and ideas. They will make your project safe and beautiful. Enjoy decorating!
Placing Your Easter Tree in the Home
Making a DIY Easter Tree is fun. But finding where to put it in your home is key. This ensures everyone enjoys its beauty. When picking a place for your Easter tree, consider a few important things.
Ideal Locations for Display
Where you put your Easter tree matters a lot. It makes it more charming and visible. Use areas in your home where people often go.
Think about these spots:
- Entryways: A DIY Easter Tree here welcomes guests with a festive mood as soon as they enter.
- Living Room Corners: Placing the tree in a living room corner adds a surprising splash of color. It’s even better when decorated with Easter Tree Ornaments and mini eggs.
- Dining Table: A smaller tree can be a special centerpiece for family meals.
Seasonal Theme Integration
Mixing your Easter tree with your home’s decor makes everything feel welcoming. Here are some tips:
- Springtime Linens: Use spring-themed linens to match your Easter tree. This adds to the festive atmosphere.
- Additional Florals: Add fresh or artificial flowers like tulips or cherry blossoms. They bring color and look like the tree’s blooms.
- Thematic Figurines: Place Easter-themed figurines, like bunnies or chicks, by the tree. This connects all the decor.
A pretty DIY Easter Tree can make any home more welcoming for the holiday. With 65% of U.S. homes decorating for Easter, and 70% loving DIY, it’s a great way to get into the seasonal spirit. Enjoy decorating with your Easter Tree Ornaments and Mini Eggs!
Maintaining Your Easter Tree
Creating a DIY Easter Tree is just the beginning. Keeping Easter decor fresh ensures your displays stay beautiful. We’ll share easy tips to keep your decorations great. We’ll also cover how to store them well for future use.
Tips for Keeping Decorations Fresh
Making Easter decor look bright is key. For natural decor like flowers, replace or refresh them often. This may mean visiting your garden or a florist. Mini eggs and bunny statues should be dusted regularly.
To keep an Easter tree fresh, use shellac. Two thin layers protect your decorations. This keeps the color and shine, especially with paint. Remember, shellac dries overnight.
Long-term Storage Solutions
After Easter, store your items well to keep them perfect for next year. Start by taking all decorations off the tree. Wrap fragile ones in tissue paper. Sturdy containers keep them safe and easy to find.
Planning storage is smart. Use clear labels to stay organized. For example:
| Item | Storage Material | Notes |
|---|---|---|
| Mini Eggs | Tissue Paper | Wrap individually to avoid breakage |
| Bunny Figurines | Sturdy Containers | Use cardboard dividers if needed |
| Natural Elements | N/A | Replace fresh each year |
Don’t overlook the base of your DIY Easter tree! Clean it and store it dry to avoid damage.
With these tips, you’ll master both making and maintaining an Easter tree. Happy decorating for Easter!
Conclusion: Celebrate with Your DIY Easter Tree
Let’s celebrate the effort and creativity you put into your DIY Easter tree. This year, Easter is on Sunday, March 31, 2024. Your tree will bring warmth and joy, starting the season right. It shows your unique style with mini eggs, bunny decorations, and pretty ribbons.
Final Touches for a Perfect Easter Display
Your Easter tree looks great. Now, add some final touches. Put personalized tags on eggs or flowers at the tree’s base. These details will make your tree the center of attention. Place it where everyone can see, like your living room or entryway. Good lighting will make it look even better!
Encouraging DIY Creativity in Others
Your Easter tree is not just decor; it’s a sign of creativity and joy. Invite friends and family to make their own. Or share your tips online. Use recycled materials to be kind to the planet. The Easter tree has roots in Germany. Let’s make it part of our celebrations.
You should be proud of your DIY Easter tree. It will make this Easter very special. Cheers to more creative projects and celebrations! 🌸