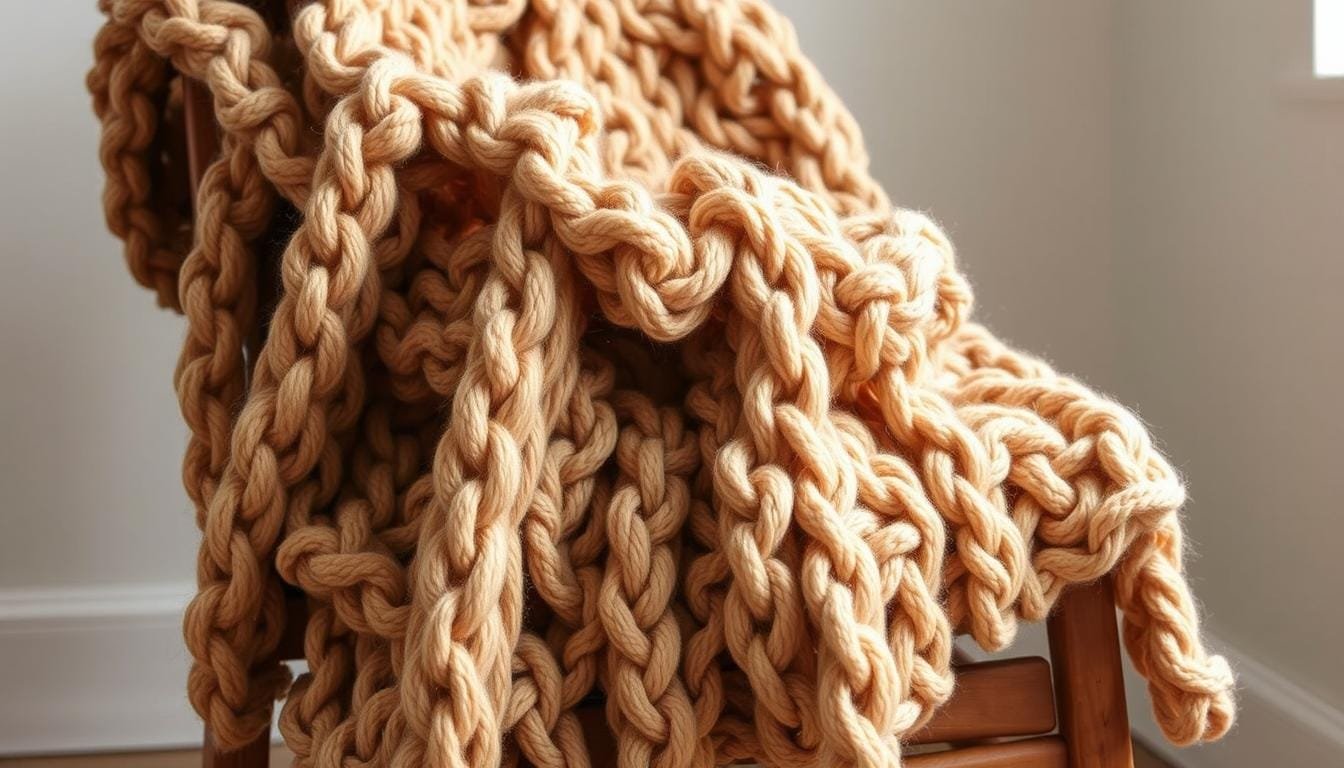
When the first autumn leaf fell, I immediately wanted to curl up under a soft blanket. The thought of making a DIY chunky knit blanket was too appealing to ignore. It’s not just about the blanket. It’s about the journey of every loop and stitch. I’ll show you how to make your own cozy blanket without needles.
You don’t need to know how to knit for this project! I found out about arm knitting and finger knitting. It’s easy and doesn’t require big, scary needles. All we need is our hands, some super soft Bernat Blanket Big yarn, and a little time.
Imagine spending just a few hours to create a big, soft blanket. This project is quick and easy. It’s perfect for weekends or while binging Netflix. Such a fast way to make something so cozy. It also makes a thoughtful gift for someone special.
Let’s start this exciting project together. We’ll make an amazing chunky knit blanket and feel proud of our work. So, grab your yarn and let’s get started on our no-needle knitting adventure!
Introduction to Chunky Knit Blankets
Chunky knit blankets are now a top trend for stylish homes. They keep you cozy in winter and add style to your decor. If you want to start a new yarn project or try chunky yarn crafts, this guide is for you. You’ll learn about chunky knit blankets and their benefits.
Benefits of Chunky Knit Blankets
Chunky knit blankets are more than just pretty. They are very warm, perfect for cold weather. Their thick texture makes any room cozy and inviting. These blankets are great for DIY projects, adding a touch of handcrafted charm to your space.
They make wonderful, personal gifts for any occasion. With sizes from throw blankets to king-size, there’s a chunky knit blanket for everyone.
Popular Yarn Types for Chunky Knits
The yarn you pick is key for chunky yarn crafts.
- Merino Wool: It’s super soft and warm, a luxury choice for blankets.
- Acrylic Blends: These are less expensive, durable, and easy to care for.
- Alpaca: Known for its softness and luxury, it’s great for comfort and warmth.
For a throw-sized blanket, you’ll usually need 4-6 skeins of chunky yarn. Larger blankets may need 8-10 skeins. Bulky and super bulky yarns create thick, cozy blankets. Choosing the right yarn means considering warmth, texture, and care, to make the perfect chunky knit blanket.
Materials Needed for No-Needle Knitting
Starting a no-needle blanket project means collecting some important items. The yarn choice is key for a soft, arm knit throw.
Recommended Bulky Yarn
Choose Super Bulky (size 6) yarn for your project. Brands like Bernat and Balapet have the perfect yarn for this. You’ll need about 14 skeins, with each one having 21 yards, for a total of 294 yards.
Alternative Materials
While bulky yarn works well, you might like trying chunky chenille or jumbo yarn too. These materials add unique textures and make your blanket extra cozy.
Essential Tools
Even without needles, you still need a few tools. Sharp scissors are a must for clean yarn cuts. A flat surface helps keep your work tidy.
Optional items like stitch markers and a tape measure are helpful too. They’ll help you keep track of your knitting progress.
With your materials and tools ready, you can begin your cozy arm knit blanket. Enjoy making something warm and beautiful by yourself!
Understanding the No-Needle Technique
Ever wondered how to create a chunky knit blanket without needles? You’re in luck! No-needle knitting lets you use your arms or fingers. It’s a fun DIY way to make plush blankets. And you don’t need any knitting experience to start.
Overview of Arm Knitting
Arm knitting uses your forearms to make a chunky, cozy blanket. This tutorial shows you how. You begin with 65 loops for the base. By pulling yarn through these loops and adding one, you end up with 66. Using your arms creates big loops for a soft, airy blanket that’s perfect anywhere.
For a normal-size throw, you need 108 yards of thick yarn. Six skeins of the right yarn, like Alize Blanket EZ, are usually enough. You can complete this project over a weekend. Dropped loops? No worries. The yarn hides mistakes, making your blanket look great!
How Finger Knitting Works
Finger knitting lets you weave a blanket without needles, too. Loop yarn around your fingers for neat stitches. Start with 62 loops for the base.
Using Bernat Alize Blanket-EZ yarn, seven skeins are needed for a throw. This yarn is soft, durable, and comes in many colors. Working a bit each night, you can finish in a week.
Adding new yarn skeins is easy. Just connect the old and new loops. A special pattern adds texture to your blanket.
Choose arm or finger knitting, and enjoy making your blanket. Finishing it feels amazing.
Preparing Your Workspace
Before starting on your hand-knit blanket, it’s key to prepare a workspace. This guide will show you how to create the perfect spot. It will support both your creativity and comfort.
Creating a Comfortable Environment
Picking the right spot for your project can change your whole experience. Make sure it’s well-lit, using natural or artificial light. This will keep your eyes from getting tired. Adding cozy touches like cushions or a comfy chair can invite comfort. It’s also important to choose a place without distractions. This way, you can focus fully on the calming act of knitting.

Organizing Your Supplies
Having your supplies in order makes knitting much smoother. Put your yarn, scissors, and other tools on a flat surface. This setup helps keep things tidy and within easy reach. An organized space lets you enjoy and follow the knitting guide better.
| Workspace Essentials | Benefits |
|---|---|
| Comfortable Seating | Reduces strain and supports longer knitting sessions |
| Proper Lighting | Minimizes eye strain and enhances focus |
| Organized Tools | Streamlines the knitting process |
| Clutter-Free Space | Enhances creativity and reduces distractions |
Choosing the Right Pattern
When picking a pattern for your chunky knit blanket, think about your skills and style. There’s something for every knitter, whether you’re just starting or ready for a challenge.
Exploring Simple Patterns
Beginners should try easy patterns that use basic stitches. The stockinette stitch is great for learning. It’s knitting one row and purling the next. Start with a simple arm knit throw using super-bulky yarn, like one weighing 2267 grams. You can finish it in less than two hours, perfect for knitting newbies.
Try casting on 12 stitches for a blanket about 25 inches by 57 inches. Soft yarns, like Go For Faux or Yooge, make it extra cozy. Getting kids involved can also make crafting more fun.
Advanced Designs for Experienced Crafters
If you’re skilled, try complex patterns or multiple colors to show off your creativity. Making a large queen-size blanket needs more yarn, about 6-8 skeins of super bulky weight. Merino wool is great for its warmth and luxury, especially in cold weather.
Advanced knitters can use detailed stitches or color blocks for a personalized throw. Mixing stitches can create unique textures. For example, varying knit and purl stitches can make a cozy blanket stand out. Check our Yooge Big Knit Blanket tutorial for more ideas.
Finding the right pattern means matching your skills with the design you want to try. Whether simple or complex, you’re on track to make a beautiful chunky knit blanket!
For more DIY home project ideas, check out our rustic charm DIY.
Starting Your Chunky Knit Blanket
Starting to make your chunky knit blanket is both fun and useful! It’s an easy no-needle blanket project. The first step is crucial for a good beginning. We’ll learn how to cast on and knit the first row for a smooth start.
Casting On for Your Blanket
Casting on is the first step of your warm yarn projects. Begin with a slipknot to make the initial loop. Wrap the yarn around your fingers and pull it through to knot it. Then, put this loop on your wrist and add more loops until you reach your blanket’s desired width. We’ll need 30 loops for a width just under a queen-sized bed. Choosing a bulky yarn, about 35 oz per skein, adds the perfect chunky feel.

Starting the First Row
After casting on, it’s time to knit the first row of your easy no-needle blanket. Pull the working yarn through each loop, switching the loop from one hand to the other. This technique ensures a firm and even start. Each skein provides 54 yards of yarn, enough for the beginning rows. Beginners might use around 5 hours for these steps, but you’ll get faster and more confident with practice.
Keep a relaxed grip when knitting to make sure your stitches are just right. The beginning may feel strange, but soon knitting will feel more natural. You’ll see the texture of your warm yarn project come to life.
Let’s be confident and make a blanket that adds warmth and beauty to our homes! 🌼
The Basic Stitches to Know
Starting with chunky yarn crafts? It’s key to learn the main stitches for a beautiful, no-needle knit blanket. Let’s focus on two important ones: the knit stitch and the purl stitch.
The Knit Stitch Explained
The knit stitch is a big deal in knitting projects. It makes a smooth, “V” shape on the fabric which looks good and works for many designs. Whether it’s soft Merino wool or affordable acrylic yarn, getting the knit stitch right opens the door to all sorts of chunky yarn creations.
The Purl Stitch Overview
The purl stitch gives a bumpy texture, adding depth to your blanket. It’s great for ribbing and patterns, making it a skill you want to have. Mastering both knit and purl stitches preps you for more intricate designs.
Learning these stitches lays the groundwork for your knitting projects. Remember, the yarn you pick matters a lot. It affects your work’s look and feel, so choose based on what you need your project to be like.
Adding Colors and Textures
Adding different colors and textures can make your chunky knit blanket more appealing. By mixing hues and finishes, you’ll create a cozy arm knit throw that’s lovely to touch and see.
Let’s look at ways to make your warm yarn projects pop.
Techniques for Color Blocking
Color blocking uses different colored yarns in sections to add a modern touch. Here’s a simple guide:
- Pick 3 different yarn colors.
- Begin with the first color and knit it for a third of your blanket.
- Switch to the second color and knit another third.
- End with the third color for a bold pattern.
This method not only makes your blanket more interesting but also helps use up leftover yarn. For instance, a striped pattern can come from 2 skeins of 3 colors each.

Using Varied Yarn Textures
Mixing yarn textures adds a layered feeling to your blanket. Try using Merino wool with acrylic or vegan yarns. Each type has a unique touch and look, from Merino wool’s softness to acrylic’s strength.
| Yarn Type | Texture | Shedding Ratio |
|---|---|---|
| Couture Jazz Yarn | Super Soft | Does not shed |
| Chunky Luxe Big Yarn | Plush, Thick | Sheds slightly |
Try different textures in one blanket to improve its appearance and comfort. This makes your cozy arm knit throw perfect for cold nights. Combining yarns turns your warm yarn projects into lasting art, making your home cozy and stylish.
Managing Your Yarn
To keep your no-needle hand-knit blanket project smooth, organizing your yarn is key. This stops tangles and makes knitting fun. Below are tips to handle your yarn easily.
How to Avoid Tangling
Tangling can really mess up a no-needle blanket project. To prevent it, keep a steady tension on your yarn. This helps the yarn move smoothly. Also, rewinding your yarn skeins into balls can make them simpler to work with.
Keeping Your Yarn Tidy
Store your skeins neatly, perhaps in a basket or a yarn bag. This keeps them clean and free from dust. That way, your final blanket will look and feel better. If you’re right-handed, place your yarn on the right; if left-handed, on the left. This keeps it handy without getting in your way.
Consider using yarn bobbins or clips for handling many colors or yarn sections. They prevent the strands from getting tangled. This method makes your project look neat and saves on materials, giving your blanket a professional touch.
Measuring and Keeping Track
Creating a DIY chunky knit blanket is a fun and rewarding project. To get the right size, it’s key to measure and track your work carefully. With consistent measuring and adjustments, your blanket will turn out just right. We’ll show you some great ways to do just that:

How to Measure Your Blanket Size
First, know the standard blanket sizes. Here’s a quick guide:
- Baby Blanket: 38 x 38 inches (97 x 97 cm)
- Lap Blanket: 36 x 48 inches (92 x 122 cm)
- Throw/Afghan: 54 x 68 inches (137 x 173 cm)
- Twin: 65 x 90 inches (165 x 229 cm)
- Double: 85 x 90 inches (216 x 229 cm)
- Queen: 90 x 90-100 inches (229 x 229-254 cm)
- King: 108 x 90-100 inches (274 x 229-254 cm)
As you work, measure your blanket’s length and width. Lay it flat and use a tape measure. Be consistent with how you measure. If it’s not even, adjust your tension to fix it.
Techniques for Tracking Your Progress
Keeping track of your progress is crucial. Here are some easy tips:
- Counting Rows: Note how many rows you’ve done. Patterns, like 2 x 2 ribbing (K2, P2), make tracking easy with alternating row instructions.
- Markers: Stitch markers are your friends, especially with new yarns or color changes.
- Project Journal: A journal or digital note helps keep track of your progress and measurements.
Using these strategies will help keep your blanket project on track. Measure carefully, track your progress, and enjoy making a cozy masterpiece!
Completing Your Chunky Blanket
After hours of fun knitting, it’s time to finish your cozy arm knit throw. Finishing it well means your blanket stays together and looks great.
How to Bind Off Effectively
Binding off may seem scary, but it’s easy in your knitting guide. Start by knitting two stitches as you always do. Pull the first stitch over the second stitch and off the needle. Keep going until you’ve bound off all stitches. This method locks the stitches, stopping them from coming undone.
Checking for Loose Stitches
Before you celebrate, check the blanket for loose stitches. Feel the blanket for any uneven spots. If you find a loose stitch, tighten it with a crochet hook. This keeps your blanket sturdy and free from snags.
Finishing Touches for Your Blanket
After you’ve spent time and creativity on your hand-knit blanket, the final steps are key. Learn to weave in ends neatly and add your own touches. This will make your project shine.

Weaving in Ends
Weaving in ends helps your yarn projects last and stay together. Start by threading the yarn end onto a needle. Weave it in and out on the blanket’s back to secure it. This cleans up loose ends and makes your blanket stronger.
Adding Personalized Embellishments
Add your personal flair with unique touches on your blanket. Think about sewing in your initials or a special symbol. Adding fringe or tassels can make your blanket look and feel nicer. These personal details turn your blanket into a unique piece that’s warm and stylish.
| Yarn Type | Texture and Care | Embroidery Ease | Durability |
|---|---|---|---|
| Couture Jazz | Thick and durable, easy care | Easy | High |
| Chunky Luxe Big Yarn | Slightly thinner, prone to shedding | Moderate | Medium |
| Loop Yarn | Less chunky, pre-looped design | Easy | Medium |
The final steps, like weaving in ends or adding designs, really lift your yarn projects up. Take pleasure in creating and customize your work. This makes it stand out and keeps it cozy for years.
Care Instructions for Your Chunky Knit Blanket
Proper care keeps your chunky knit blanket cozy and beautiful. Let’s look at the best ways to wash and keep your knit blanket perfect.
Best Washing Practices
Knowing your yarn type is crucial for washing your chunky knit blanket. If your blanket is made of machine-washable materials like acrylic, cotton, or polyester, you’re in luck. Use a gentle cycle for about 60% of these fibers to keep them in great shape.
For hand-wash only fibers like wool or silk, be gentle. Soak for 15 minutes in cool water with a mild detergent. Stay away from hot water and bleach to avoid damage.
The yarn’s material dictates how you should wash your blanket. Washable wool or acrylics can go in the machine with cold water. But natural wool requires a cold hand wash to avoid damage.
You might need to rinse your blanket several times to get all the soap out. Always reshape it when it’s drying. This keeps the blanket’s shape perfect for all blankets made using the no-needle method.
Use a gentle cycle if your washer has an agitator. And put your blanket in a lingerie bag to avoid harm. This tip helps with about 70% of blanket care.
How to Store Your Blanket
Storing your chunky knit blanket properly keeps it looking great. Keep it out of sunlight and away from moisture. The best place is cool and dry.
Store your blanket folded or rolled instead of hanging it. Hanging stretches the stitches. Clean wool blankets every three months to keep them fresh.
Don’t use plastic bags for storing, as they trap moisture. Choose breathable storage like cotton bags instead. These tips will help your blanket stay lovely for a long time!
Inspiration and Ideas for Your Next Project
Finished your first DIY chunky knit blanket? Great! Now, let’s look at other fun knitting ideas. Keeping your knitting journey thrilling and rewarding is what’s next. 🌟
Exploring Design Variations
Trying new designs can add excitement to your knitting. You could make a cozy arm knit throw with different patterns. Or, add a splash of color with color-blocked rugs to liven up your space.
For example:
- Color blocking: Mix bold colors of chunky chenille yarn for striking designs.
- Texture mixing: Blend tube yarns and merino wool in one project for a unique feel.
- Size matters: Go big with a king-sized DIY chunky knit blanket (110″ x 108″). Or, a cozy arm knit throw perfect for the couch.
Creative Future Projects to Try
Feeling adventurous with your knitting? Here are some advanced projects:
- Arm Knit Rugs: Craft beautiful and practical floor pieces with durable tube yarn.
- Wall Hangings: Create giant, textured wall art to show off your knitting talent.
- Pillow Covers: Use spare yarn from chunky knit blanket projects for matching or contrasting pillow covers. This ensures no yarn goes to waste.
- Pet Beds: Give your pets a stylish and comfy place to rest.
Every project is a chance to improve your skills, find new designs, and express yourself. The possibilities are vast, from arm knit throws to large rugs and creative wall art. 😊
Conclusion: Enjoying Your Cozy Creation
We’ve reached the end of our journey on knitting a cozy blanket without needles. It’s time to enjoy the joy of your handmade blanket. Making your own blanket gives you more than just warmth. When you knit a blanket, you put your own creativity and care into each stitch. There’s a special feeling in using a blanket that you made with your own hands.
Benefits of Making Your Own Blankets
Making your own blanket is rewarding in many ways. The process is calming, letting you relax as you knit each row. You get to pick the yarn, colors, and patterns, making your blanket truly your own. Plus, learning about yarns and knitting techniques can make your next projects even better.
Sharing Your Work with the Community
Finishing your blanket feels great, but sharing it feels even better. Showcasing your blanket to DIY communities can inspire others. Whether online or in person, sharing your work brings positive feedback and appreciation. This guide didn’t just help you make a blanket; it connected you with crafting lovers everywhere. Take pride in your work and get excited for future projects!