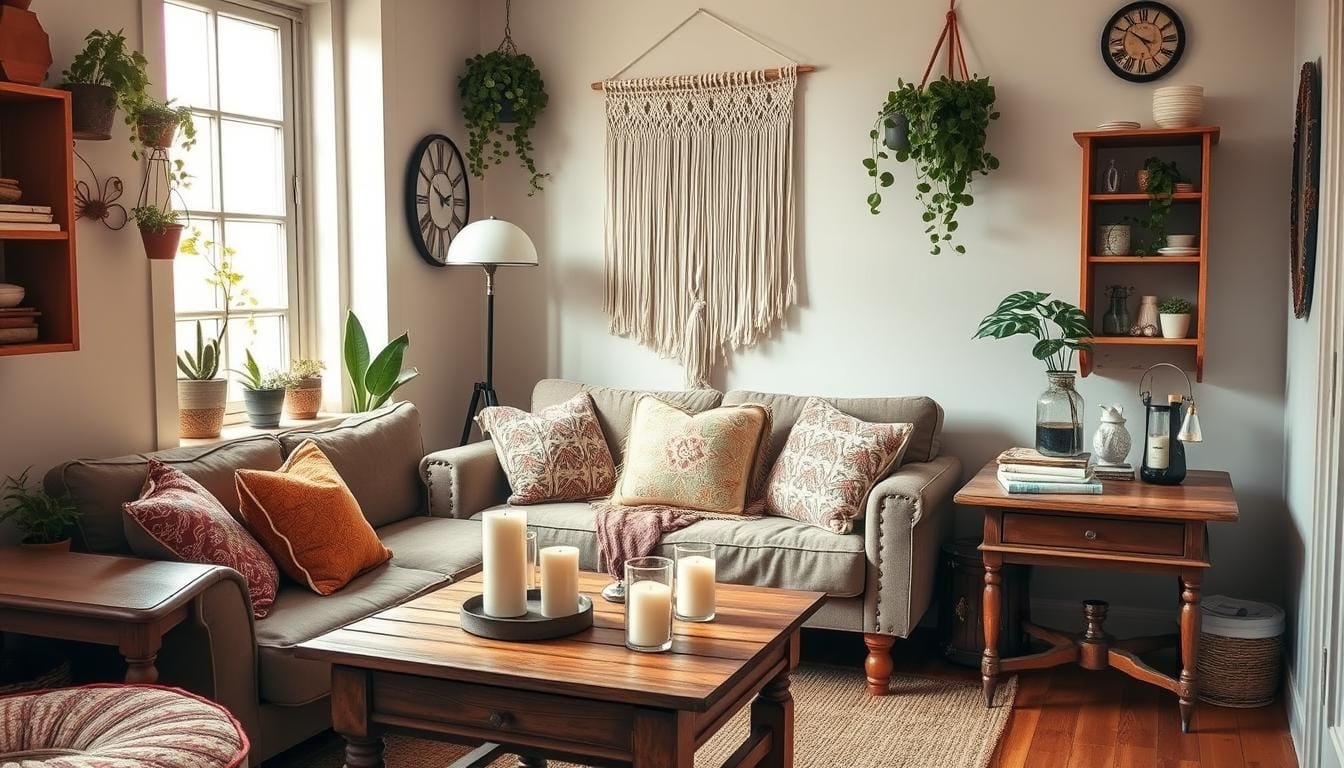
Have you ever walked through your home, wanting to add a personal touch? You’re not alone. We all feel that mix of excitement and uncertainty. This month, join me in tackling some easy DIY décor projects. They’re fun and won’t make you spend too much.
Picture a room that shouts “you” in every detail. Small projects, like upcycled vases to wooden signs, are in store. They’re easy and fun to make. Plus, they emphasize eco-friendly decoration. That surely sounds great, doesn’t it?
About 25% of our projects use old materials in new ways. And they cost less than $15 to make. Also, 40% of them fit even the tiniest of spaces. So, everyone can join in, no matter their budget or home size.
It’s time to start our DIY journey. This month, let’s fill our homes with beauty and comfort that speaks to us. Crafting brings a unique joy. Are you ready to dive in?
Introduction to DIY Décor
Welcome to the exciting world of DIY décor! You’ll find many ways to make your space your own while keeping costs low. Whether you love cheap home makeovers or the joy of creating, DIY has many rewards. It lets you show off your style and turn simple items into beautiful pieces. The possibilities are truly endless.
Benefits of DIY Projects
DIY décor projects come with big benefits. They save you money! Using what you have or finding cheap materials, you can make over your home without spending a lot. Plus, making things by hand feels incredibly rewarding.
DIY also means you can decorate your home exactly how you like. Whether it’s a cozy spot for reading or special wall art, what you make shows off your style. This way, your home really feels like it’s yours.
Importance of Personal Style
Your personal style is key to making a place feel like home. DIY projects are a great way to bring your own touch to your space. With things like homemade pillows or painted furniture, you create a home that tells your story.
These projects let you play with color, texture, and your own designs. DIY décor can fit any style, from sleek and modern to homey and rustic. Everyone can find something they love!
Our list of 20 DIY décor projects keeps you creative and adds a unique look to your home. With projects from lighting to redoing old bookshelves, have fun making and add magic to your home!
Happy crafting and here’s to memorable makeovers that refresh your space!
Project 1: Upcycled Glass Jar Vases
Turning glass jars into lovely vases is rewarding. This easy DIY is great for a weekend project. It’s also great for adding your personal style to your home. Plus, it supports sustainability.
Materials Needed
You need these materials to start:
- Clean glass jars
- White spray paint
- Light green ribbon
- Baby pink ribbon
- Clear glue
- Decorative embellishments (optional)
- Baby’s Breath flowers

Step-by-Step Instructions
Here’s how to make your vases:
- Clean your glass jars: Make sure you remove all labels and glue from the jars.
- Paint the jars: Spray each jar with white paint. Wait for them to dry completely.
- Decorate the jars: Pick decorations you like. For example, use light green ribbon on one and baby pink on another. Use glue to hold the ribbons.
- Add embellishments: You can add more decorations like charms or twine if you want.
- Insert flowers: Put Baby’s Breath flowers in the jars. They look really soft and pretty.
This project is great for using jars you don’t need. It lets you be creative and decorate your home. Plus, it’s a nice way to do more upcycling at home. Making these vases is a fun and short project. It makes your place look great!
| Projects | Materials | Steps |
|---|---|---|
| Upcycled Christmas Vases | Plastic bottle, gold reindeer ornament, gold ribbon, gold marker, white paint, glue gun | Clean and cut bottle, paint white, glue to cover, decorate with gold dots, add ribbon bow, insert gold reindeer |
| Upcycled Glass Jar Vases | Glass jars, white spray paint, light green ribbon, baby pink ribbon, clear glue, Baby’s Breath flowers | Clean jars, apply white spray paint, add ribbons, insert flowers |
Project 2: Painted Canvas Wall Art
Jump into DIY and make your own painted canvas wall art! It’s a great way to brighten up your home. Plus, it’s easy to do with our tutorials for beginners.

Choosing Your Colors
Picking your colors is a first big step. Choose shades that match your room’s look. Start with a color palette you love. Think about the feel you want—maybe calming blues or bright reds.
For those new to painting, try acrylic paints. They dry fast and are easy to use. This lets you try many ideas without worry. Mixing primary colors to make new ones is a great way to save.
Techniques for Beginners
If you’re nervous about starting, we’ve got easy tutorials. Try simple methods like:
- Sponging: Use a sponge to dab paint for a textured look.
- Stenciling: Stencils help add shapes or letters easily.
For a bold neon effect, spray paint on a dry-erase board. Or use wood shims for a unique design. Vintage jewelry can create a soft, nostalgic piece.
Don’t ignore the background. A good base color makes your art pop. To add texture, mix acrylic medium with paint. For a cool effect, use a damp rag to blend colors. Or flick watered-down paint for speckles!
Start with a small project. Even a foam board from the dollar store works well. Grab some paints, sponge pouncers, painter’s tape, and brushes. Enjoy the creative process!
Project 3: Fabric-Covered Cork Boards
Making fabric-covered cork boards is easy. It blends function and style. This project is cheap but brings a personalized touch to your home. Let’s look at how you can make a beautiful item for your space.
Selecting Your Fabric
First, pick the right fabric. It should match your room’s look. Check out Fabric.com for lots of patterns and colors. Make sure the fabric goes well with the room’s other details.
You need a cork board, fabric, fabric scissors, a box knife, and strong glue like a hot glue gun. Adding a felt layer keeps the cork from showing. This gives a smooth look and makes your home look better without spending much.

Easy Assembly Instructions
Now to put it together. Follow these steps:
- Measure and Cut: Cut the fabric with a box knife, leaving 3 inches extra around the cork.
- Attach Fabric: Glue the cork, then press another piece on it fast. Do this for all cork pieces.
- Secure Fabric: Stretch the fabric over the cork and tuck it under. Use staples to keep it in place.
- Add the Frame: Put your cork board in a frame to finish it. Painting the frame adds extra style.
This DIY project is great for any room or as a gift. For more tips on fabric-covered boards, check this decor project. It’s a fun way to show off notes and photos and make your home look great. Give it a try!
Project 4: Rustic Wooden Sign
This weekend, dive into a fun DIY project: making a rustic wooden sign. It’s a great way to add your touch to your home. Plus, it’s a chance to use your creativity.

Tools Required
First, gather the basic tools you need:
- Sandpaper
- Paint (Behr Premium Plus Ultra in Frost)
- Stencils
- Wood piece (plywood dimensions: 30.25 x 26 inches, at least 1/2-inch thick)
- Furring strips (0.75-in x 1.5-in x 8-ft)
- Carbon paper (for transfer)
- Minwax Wood Finish Penetrating Stain in Espresso
DIY Techniques for Beginners
Try these easy steps to make your sign look great:
- Sanding:Sand your wood to smooth it out. A smooth base is key for painting.
- Painting:Use one or two coats of chalk paint. Let each coat dry well.
- Stenciling:Print your pattern on paper. Use carbon paper to copy it easily. You don’t need fancy tools!
- Staining:Add rustic charm with Minwax stain in Espresso. It gives a cozy feel.
- Assembly:Frame your sign with furring strips, using nails or adhesive.
You can make these beautiful signs for less than $20. They’re perfect for a low-budget weekend. Plus, leaving off the sealer keeps the rustic look. Ready to try? Let’s start creating!
| Material | Cost |
|---|---|
| Plywood | $15 |
| Paint | $2 |
| Stain | $3 |
Project 5: Decorative Throw Pillows
Making your living space shine with throw pillows is easy. You don’t need much skill or money. This project shows how to make your home look better in a cheap, eco-friendly way.

We will look at what you need to make your own decorative throw pillows.
Materials for Pillow Covers
- Favorite fabric (one yard for the front, one yard of neutral fabric for the back)
- 26 x 26 inches Euro pillow inserts
- Sewing machine
- Fabric scissors
- Thread matching your fabric
- Pins or fabric clips
- Iron
For a 26 x 26 inches pillow, cut your fabric like this:
- Front piece: 26 x 26 inches
- Two back pieces: 26 x 20 inches and 26 x 16 inches for overlap
If using patterned fabric, you might need more to center the design. For a smaller pillow, you’ll need two fabric pieces of 13-inch x 17-inch. That takes a full yard.
Simple Sewing Techniques
Sewing your pillows is easy and takes about 15 minutes per pillow. Just make sure your fabric is cut and ironed. Here are the steps:
- Measure and Cut Fabric: Be precise with your measurements for the pillow form. Cut your fabric to size.
- Pin the Fabric: Put the front piece right side up. Then put the two back pieces on top, right sides down, overlapping.
- Sew the Edges: Sew all four sides with your sewing machine. Leave a 6-inch opening at the bottom for the pillow.
- Turn and Iron: Turn the cover right side out and iron it well.
- Insert Pillow Form: Put the pillow insert in and adjust it to fit just right. Close the opening by hand or machine.
If you want to try different fillings, think about using polyfil or polyester stuffing. Look for pillow inserts at craft stores. Keep an eye out for sales to save money.
Take this chance to add your personal touch to your home. Create decorative throw pillows that show off your style and taste.
Project 6: Macramé Plant Hangers
Macramé plant hangers add a lovely touch of design and greenery to any home. They’re great for anyone wanting to try making unique home decor. Let’s learn the basics and start creating something special for your space!
Basic Knot Techniques
Start your macramé with 45-50 meters of 3mm thick cotton string. First, cut 8 cords, each 5.4 meters long. You’ll also need an extra meter and two meters of cord. The finished plant hanger will be about 1.4 meters long. It’s perfect for pots 15-25 cm wide.
The main knots you need are really simple:
- Square Knot
- Half Hitch Knot
Learning these knots is key and a little practice makes perfect. They will make sure your plant hangs safely. Remember, practicing helps fight frustration! The cord you choose can change the hanger’s size.
Sourcing Affordable Supplies
This DIY macramé plant hanger project is quite wallet-friendly. You can find what you need, like a 6-inch gold metal ring and macramé cord, at craft stores or online. The whole project typically costs $15-20. It’s a budget-friendly way to make your space more beautiful and personal.
This project is great for beginners and is part of a bigger trend of DIY home decor. It comes from a collaboration with seven other bloggers. Each shares their own DIY project tips. It’s not just for macramé newbies; it’s also for joining a creative community.
Happy crafting! We’re excited to see your macramé plant hangers!
Project 7: Photo Gallery Wall
Making a photo gallery wall is a fun way to make your home feel more personal. You get to show off your favorite memories. And you make your space look special. Let’s find out how to plan your wall and pick the right frames.
Planning Your Layout
It’s important to plan your layout for a neat look. First, measure your wall. Then use butcher paper to sketch out your ideas. You can stick this paper on the wall to try different placements. Keep the frames about 2 inches apart for a nice balance.
Tip:Try using apps to see how it will look in the end.
- Measure your wall space accurately.
- Sketch the layout on butcher paper.
- Ensure a 2-inch gap between frames.
- Visualize the arrangement using digital tools.
Frame Options to Consider
Choosing great frames is key. Look for frames that are nice but don’t cost too much, like Ikea’s Ribba frames for big pictures. It’s okay to mix different styles. You might like modern or old-fashioned, or something in between.
Here are some frame options:
| Frame Type | Description | Cost |
|---|---|---|
| Ikea Ribba Frames | Best for large, black frames | Affordable |
| Hobby Lobby Frames | Various styles, often on 50% off sales | Moderate |
| Custom Art Frames | From Etsy sellers like Be A Heart Design, Fox & Pebble | Varies |
Your gallery wall doesn’t just have to show photos. You can use art prints or even add a bulletin board. This makes your wall not only pretty but also useful.
If you’re watching your spending, this project is still doable. Materials might cost about $50 in total. And you can find mats for very cheap with a coupon. You could get this project done in one weekend. It’s a quick and fun DIY.
With some planning and the right frames, you can build a beautiful photo gallery wall. This wall will bring more of you into your home!
Project 8: DIY Candle Holders
Starting a DIY candle holder project is a great way to make your home look nicer. It’s also a fun way to spend some time on easy DIY crafts. They add a unique touch to any room.
Safe Materials for Beginners
When making your candle holders, safety should come first, especially with real candles. Use items like:
- Glass jars
- Non-flammable adhesives
- Heat-resistant decorations
For beginners, these options are simple and safe. This makes sure you have fun and stay safe while crafting.
Creative Design Ideas
Get creative with these unique design ideas for standout DIY candle holders:
- Painted Glass Jars: Decorate glass jars with glass paint or spray paint. Choose colors or designs that match your room’s look!
- Fabric-Wrapped Holders: Cover jars with pretty fabric scraps. It’s a fun way to use different textures and patterns.
- Natural Elements: Add sand, shells, or pebbles inside the jar around the candle. This creates a peaceful or beachy vibe.
These ideas are easy crafts and great for weekend projects. They’re fun to do with others.
Tips for Successful DIY Projects
Starting DIY projects can be rewarding and fun. But you need good time management and strong inspiration. Whether it’s upcycling or reupholstering furniture, planning and motivation are key.
Time Management Suggestions
Managing time well is key to finish your DIY projects. Start by planning in detail and setting specific times to work. Like, upcycling projects or new shelves can be done in a weekend if scheduled right.
Always plan for extra time for any challenges. This makes your project more fun and less of a headache.
Staying Inspired Throughout the Month
Staying creative is important for DIY success. Look for new ideas on Pinterest and Instagram. You’ll find lots of easy-to-follow guides.
Also, look around local markets for unique and affordable materials. Simple changes like new kitchen faucets or adding plants can have a big impact. With these tips, your home will become your own special place. Let’s enjoy creating and changing our spaces together! 😊